OpenAI Tasks
About OpenAI Tasks
Qtip: Azure OpenAI tasks are available for FedRAMP users, but GPT tasks are not.
ChatGPT is a generative language model developed by OpenAI. You can use the Qualtrics OpenAI workflow tasks to integrate ChatGPT into your Qualtrics workflows. This allows you to build workflows that enable scenarios such as summarizing text, extracting information from text, generating responses based on text, generating code, classifying text, translating text, and more.
There are 2 different OpenAI tasks available:
- GPT: Integrate directly with ChatGPT using your OpenAI credentials.
Qtip: To use this task, you must have OpenAI API access.
- Azure OpenAI: Integrate with ChatGPT using Microsoft’s Azure OpenAI service.
Qtip: To use this task, you must have Azure OpenAI API access.
These tasks can accomplish the same outcomes. The only differences between tasks are the credentials used to set up the task and the models available for each task.
Example: Let’s say you send a CX survey to your customers to ask them about their recent in-store experience. You want to create a personalized response to their feedback. You can use the GPT task to generate a response to the customer that incorporates elements of their initial feedback.
Example: Let’s say you send a yearly CX survey to all customers to ask them for any feedback about their experience with your company. You can use the GPT task to automatically categorize responses based on their content. You can then use a ticket task to create tickets based on those categories, and assign the tickets to users who are best equipped to respond to that specific customer feedback.
Qtip: Any data sent through these tasks will be processed subject to your own agreement with OpenAI or Microsoft Azure and not your agreement with Qualtrics. Qualtrics is not appointing OpenAI or Microsoft Azure as a subprocessor with respect to these tasks.
Setting Up OpenAI Tasks
- Follow the instructions to create a new workflow. Most of the time, this will be an event-based workflow.
- Set up the trigger for your workflow. Often, you’ll begin your workflow with a survey response event, which starts the workflow when you receive a new survey response.
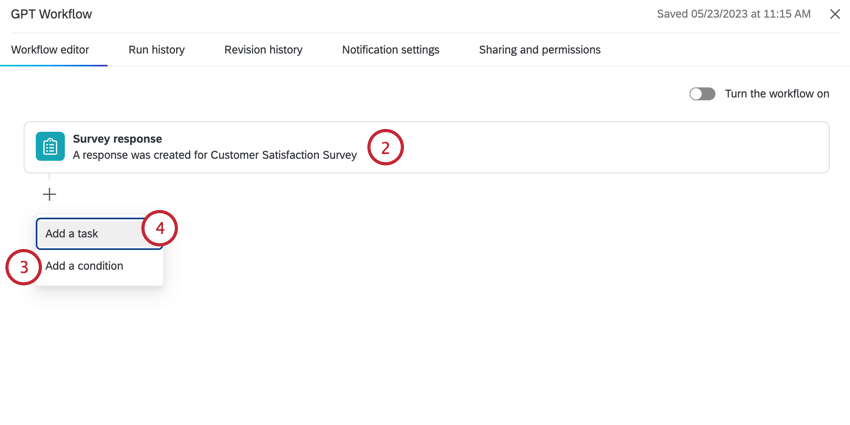 Qtip: Other common events include the ticket event, third party events (such as the Zendesk and Salesforce Workflow Rule events) and dataset record events for online review data.
 - Click the plus sign ( + ) and select Add a condition to add conditions to your workflow, which determines when the workflow triggers.
Example: For example, if you want to respond to only negative customer feedback, you add a condition based on the response’s sentiment.
- Click the plus sign ( + ) and select Add a task.
- Choose GPT if you want to use the GPT task, or Azure OpenAI if you want to use the Azure task.
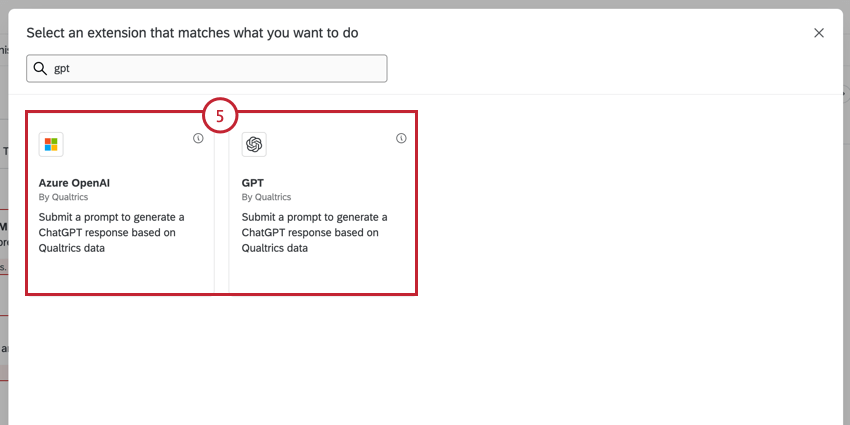
- Select an account to use. You can select an account you’ve connected previously, or choose an account that a Brand Administrator has added.
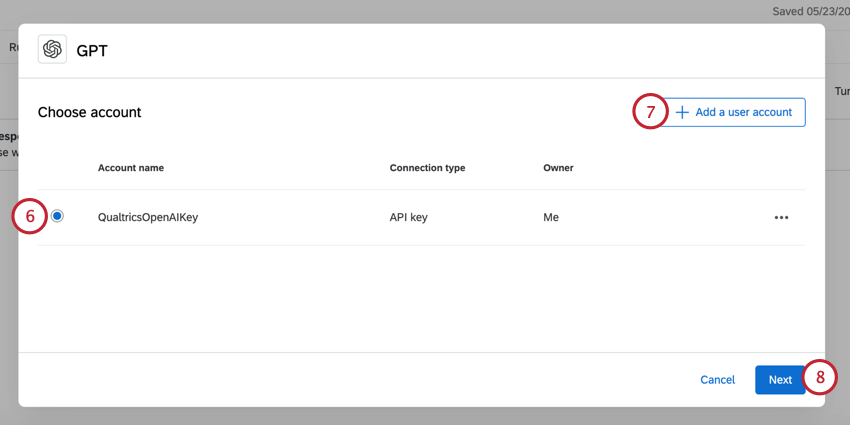
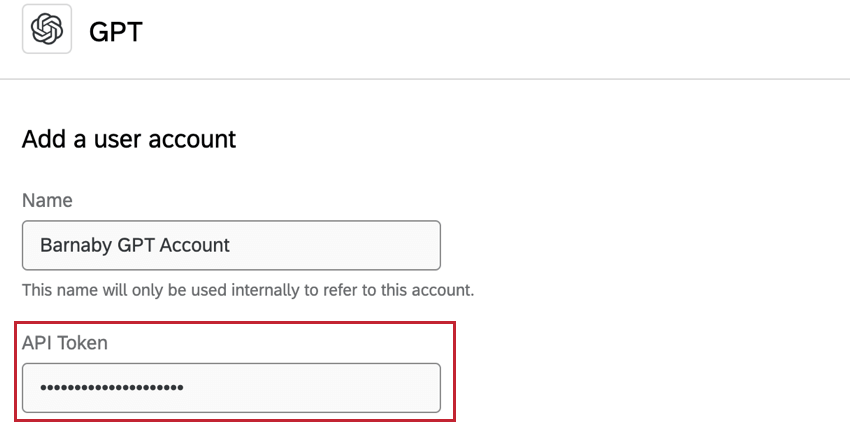
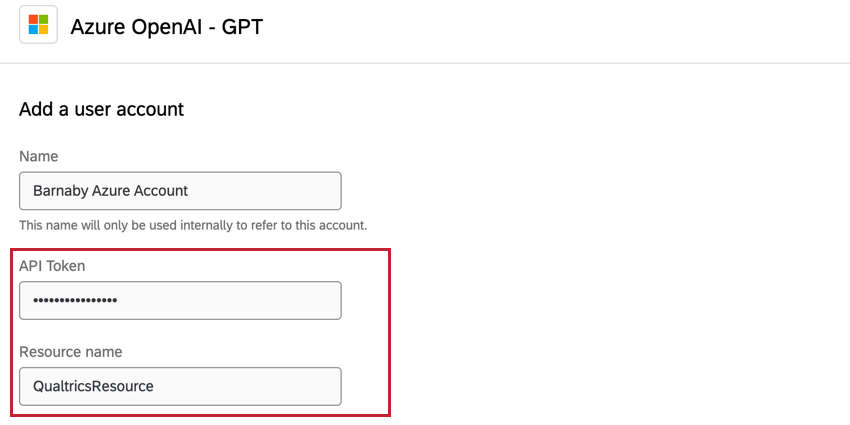
- To add a new account, click Add a user account. When adding a new account, you’ll need to give the account a name so you can recognize it in the future. You’ll also need to provide some credentials depending on the task you selected:
- For the GPT task, enter your OpenAI API token.
- For the Azure task, enter your Azure API token and the name of the resource you want to use.
- For the GPT task, enter your OpenAI API token.
- Click Next.
Qtip: The remaining steps will use the GPT task. The steps and functionality are the same for the Azure task except where noted.
- Choose a template prompt to start with or create your own prompt. You can edit any of the pre-existing templates later for your own purposes.
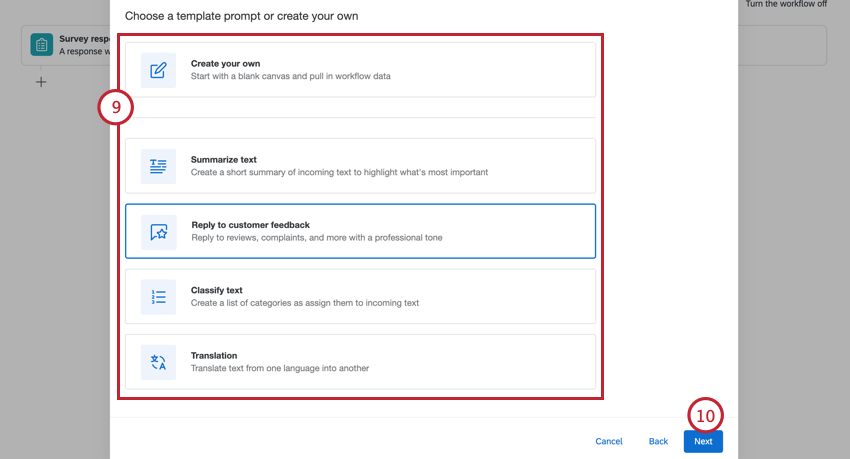
The following options are available:- Create your own: Create your own prompt from scratch.
- Summarize text: Summarizes the incoming text to highlight what’s most important.
- Reply to customer feedback: Reply to reviews, complaints, and more with a professional tone.
- Classify text: Create a list of categories and assign them to incoming text.
- Translation: Translate text from one language into another.
- Click Next.
- This step depends on your selected task:
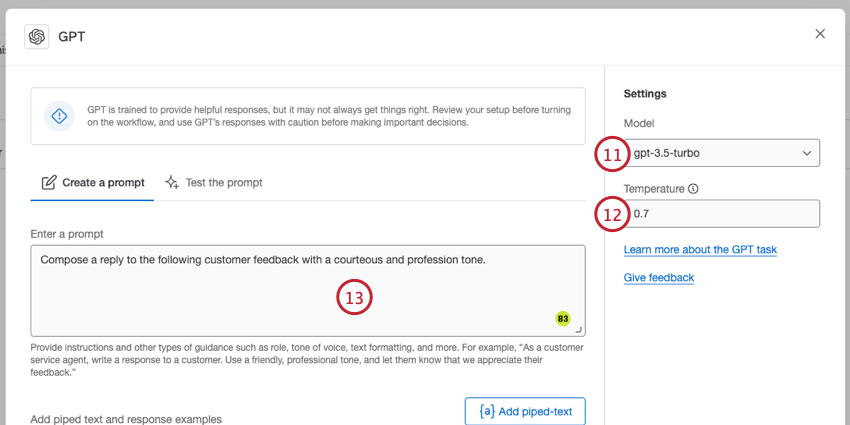
- For the GPT task, choose the model you want to use. The following models are supported: gpt-4, gpt-3.5-turbo, text-davinci-003, text-davinci-002, text-davinci-001, text-curie-001, text-babbage-001, text-ada-001, davinci, and ada. You can also use any fine-tuned models you have access to.
- For the Azure task, enter the Deployment name from Azure. This deployment must use either the gpt-4 or gpt-3.5-turbo model.
- Choose your Temperature, which determines how randomized the generated response will be. Enter a number between 0.0 and 2.0. The higher the number, the more random the response will be.
- Adjust the Prompt, if needed. Here, you can also add an example of what a response should look like. See this OpenAI support page for help writing prompts.
- In the Dynamic content section, add details to help focus the generated text. This usually includes specific information about the customer or information about your company.
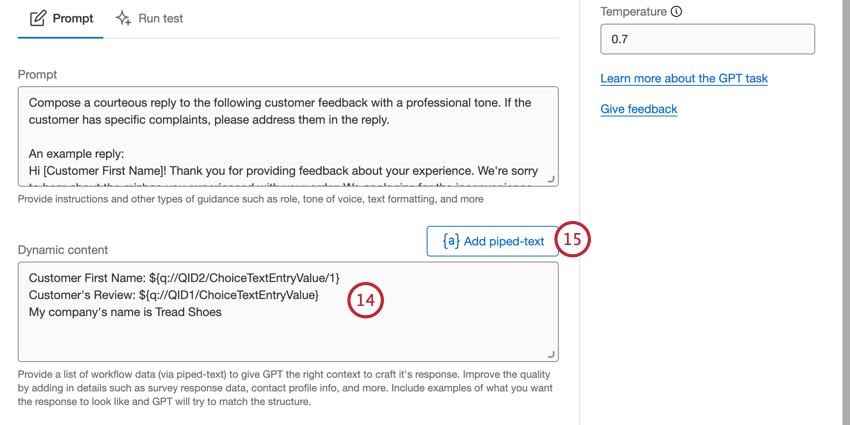
- To add in personalized information, such as the customer’s stored contact information or data from their survey response, click the {a} Add piped-text button and then choose the information you want to add. See the piped text support page for more information on using piped text.
- Navigate to the Run test tab.
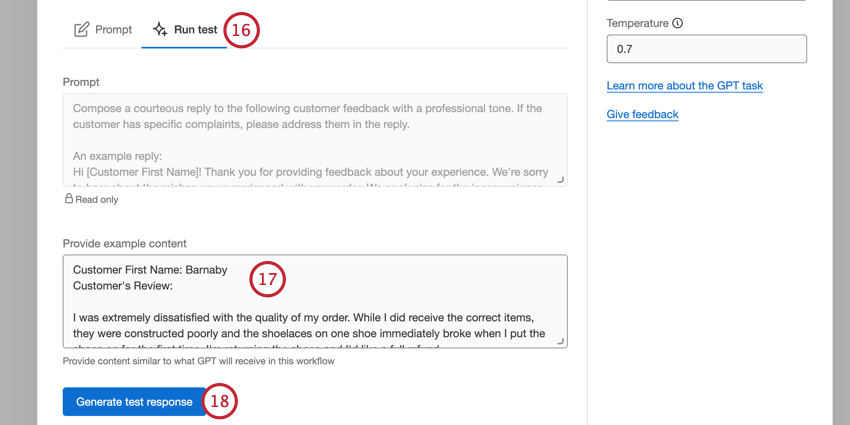
- In the Provide example content section, enter an example of the text you anticipate you will receive.
- Click Generate test response.
- An example response will appear in the Test response box. Review this response to make sure the response is satisfactory for your needs.
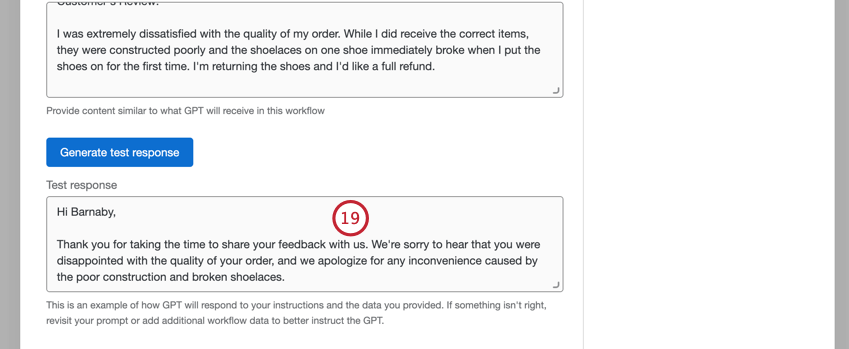 Qtip: If you need to make changes, navigate back to the Prompt tab.
 - Enable Export JSON if you’d like your task’s results to be in a JSON format. This option is only available if you use the gpt-4 or gpt-3.5-turbo model.
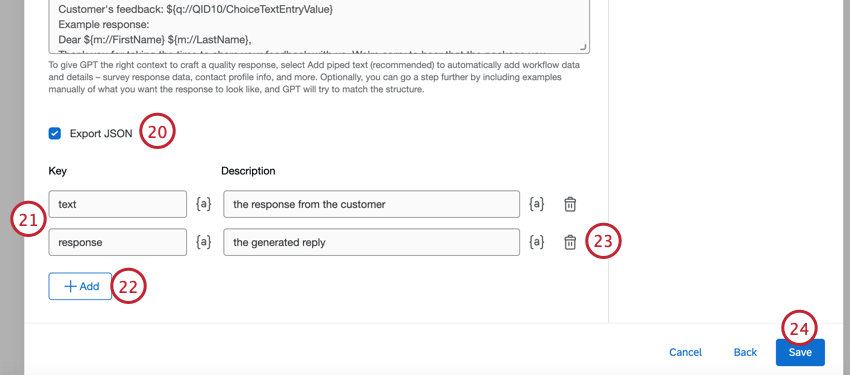
- In the Key column, add your JSON key names which will appear in your JSON output. For the Description, enter what you’d like to be saved as the value.
- To add additional key-value pairs, click Add.
- To delete a key-value pair, click the trash can icon next to the pair.
- Click Save when finished setting up the task.
- In your workflow, click the plus sign ( + ) and select Add a task.
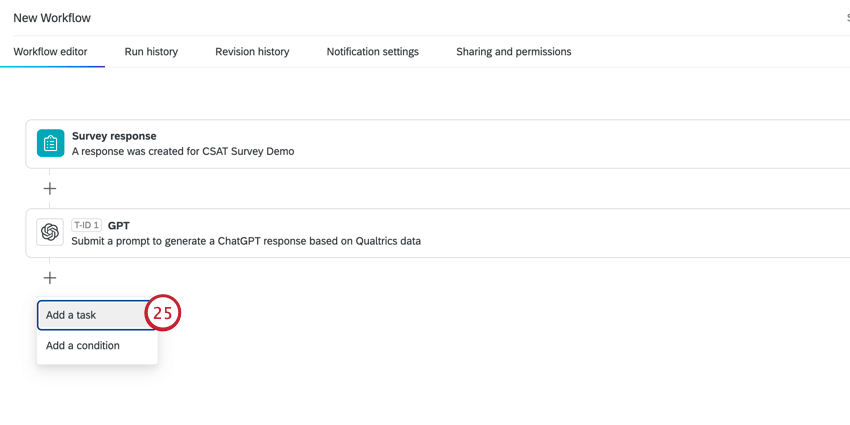
- Choose the task you want to happen after the OpenAI task. This could be a ticket task to create a ticket using the response, an email to send the response to an employee for internal review. See Defining Tasks for a list of all possible tasks.
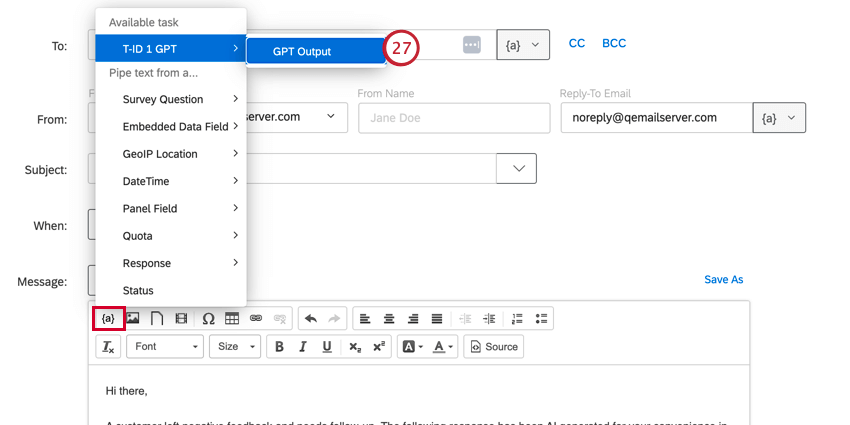
- When setting up your subsequent tasks, you can access the OpenAI task’s output via the piped text menu. Choose your OpenAI task and then select GPT Output. If you enabled the Export JSON option in the GPT task, then your JSON keys will also be available here.
