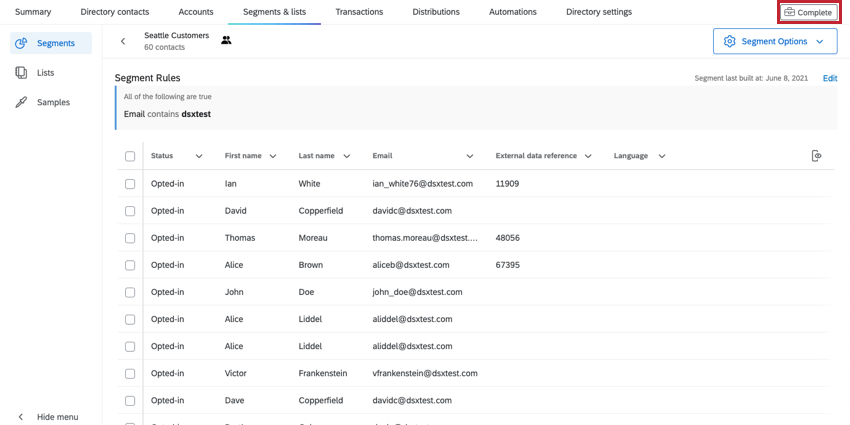
XM Directory Segments
About XM Directory Segments
Segmentation is the process of dividing the contacts in your XM Directory into different groups, based on demographics, needs, priorities, common interests, and other psychographic or behavioral criteria. XM Directory allows you to easily define segments based on these attributes.
Using Segments Across XM Directory
Once you’ve created segments in XM Directory, they can be used across Qualtrics in many of the same places that mailing lists and samples can. However, the benefit of segments is that the group of contacts is more dynamic in nature because contacts can be added and removed based on changes in their attributes.
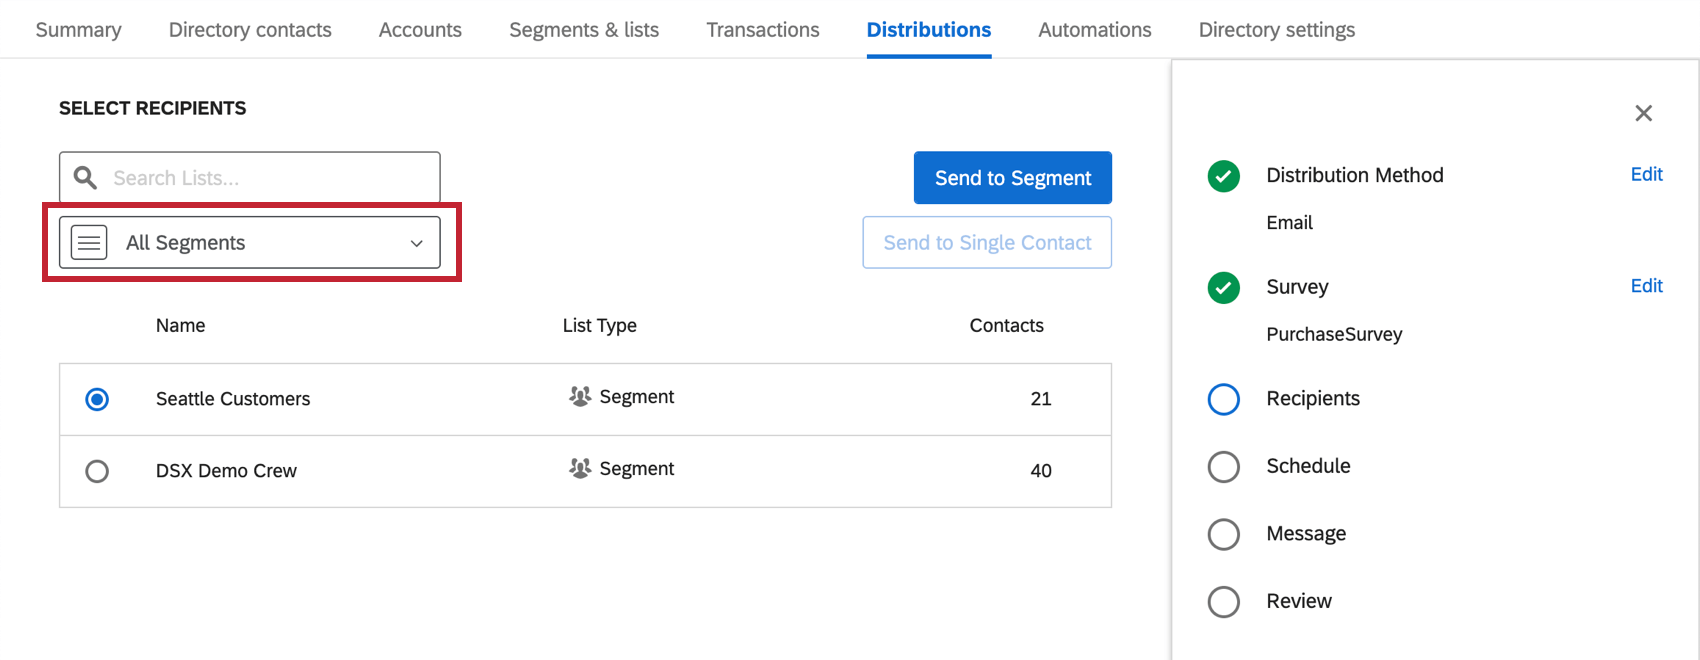
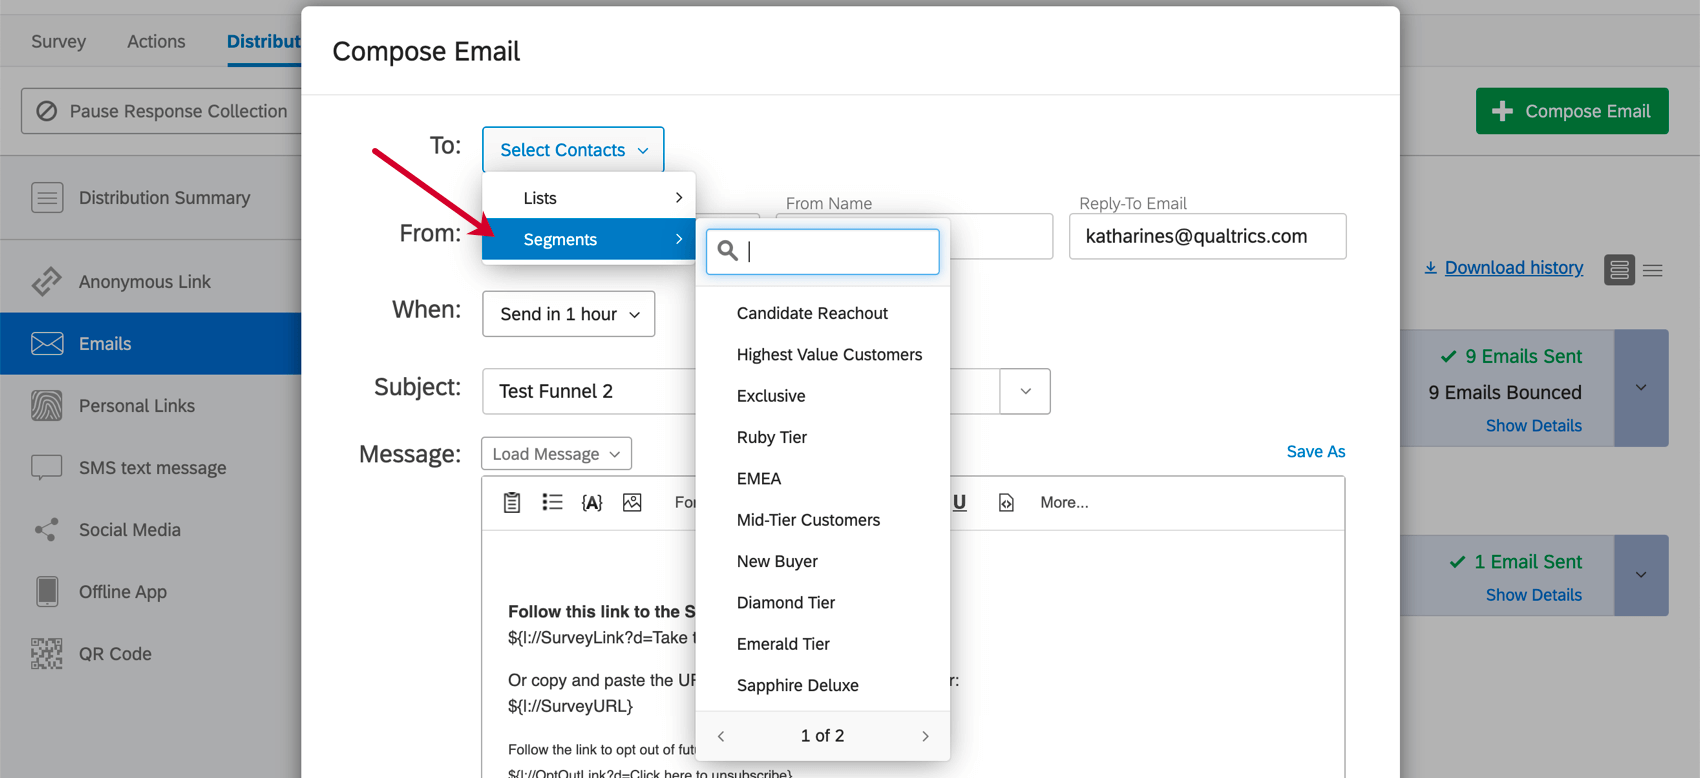
Distribute surveys through email or SMS to segments. You can also use segments for digital intercept targeting.
You can also distribute surveys to segments from inside the Distributions tab of a survey.
Creating Segments
As segments are created, you and other directory managers will be able to see them in the Segments tab of the directory.
Once a segment is created, all contacts in your directory that meet the conditions will be added to the segment. Segments are refreshed within 24 hours, so that as new contacts are added to the directory that meet the criteria, or contacts are updated so they no longer meet criteria, segments are updated accordingly. You can also manually rebuild the segment.
- Navigate to your Directories.
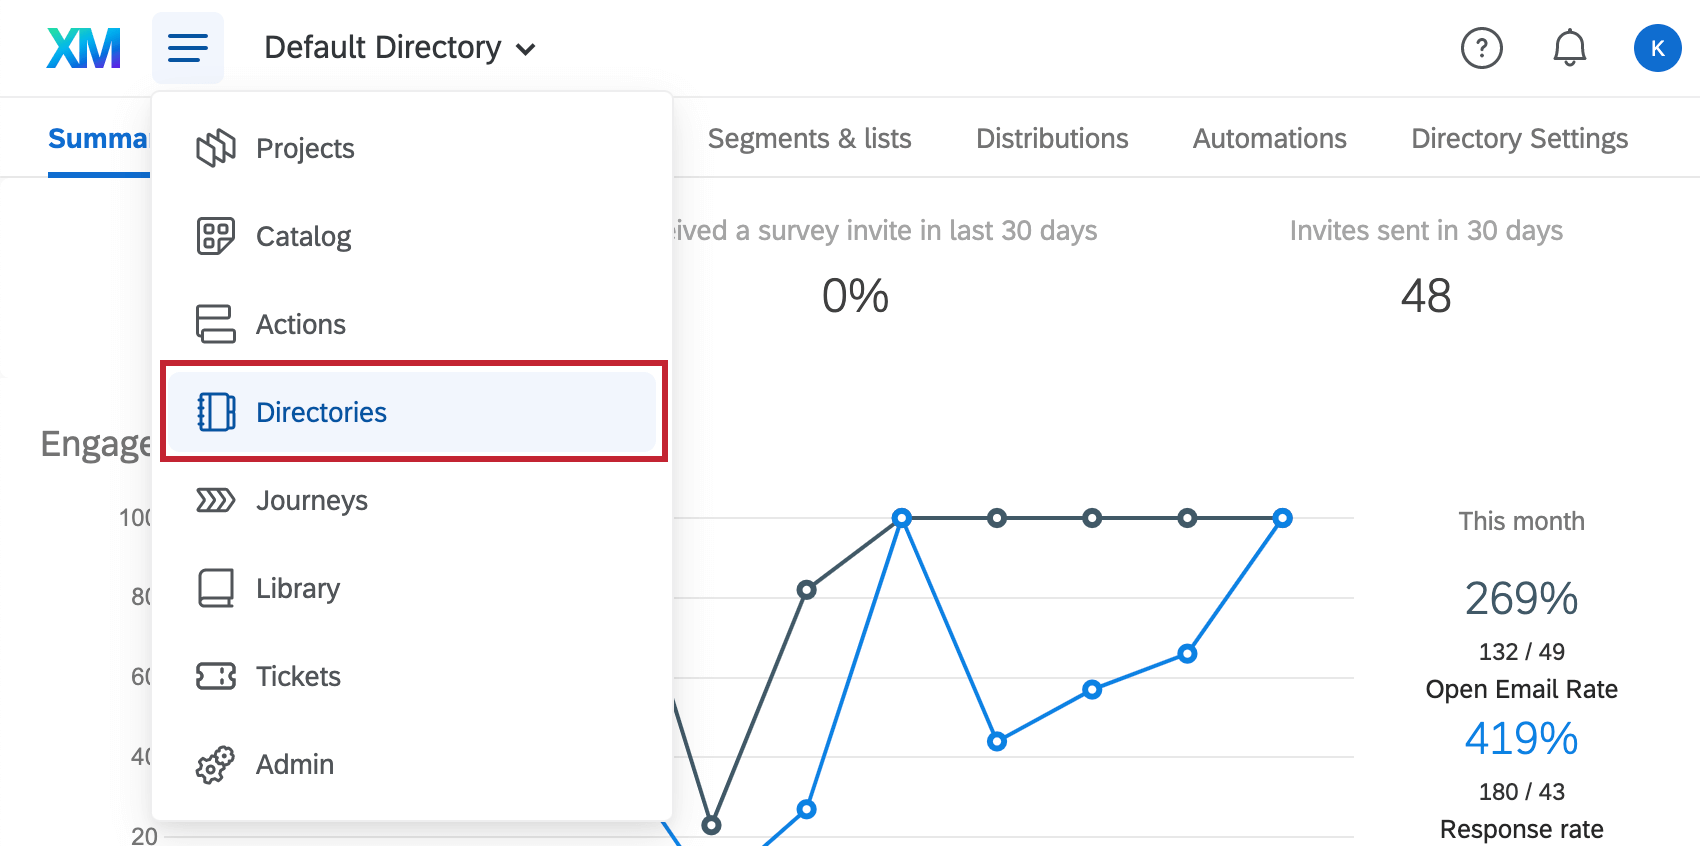
- Select the directory where you’d like to add a segment. You may have access to just one.

- Go to the Segments & lists tab.
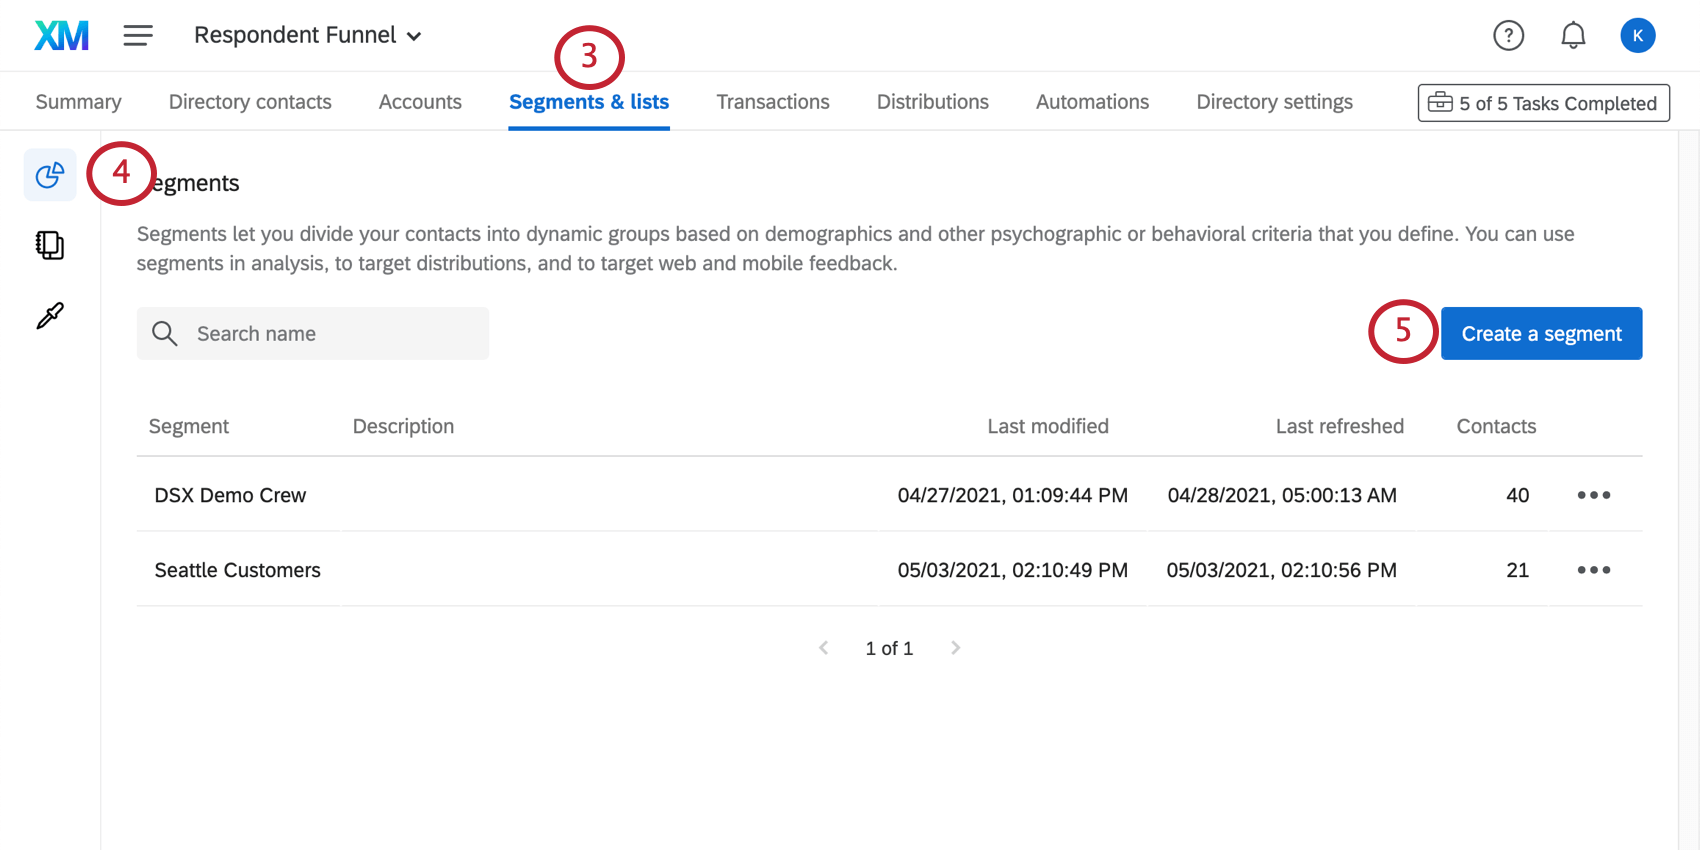
- Make sure you have Segments selected to the left. (This is the default page you will land on.)
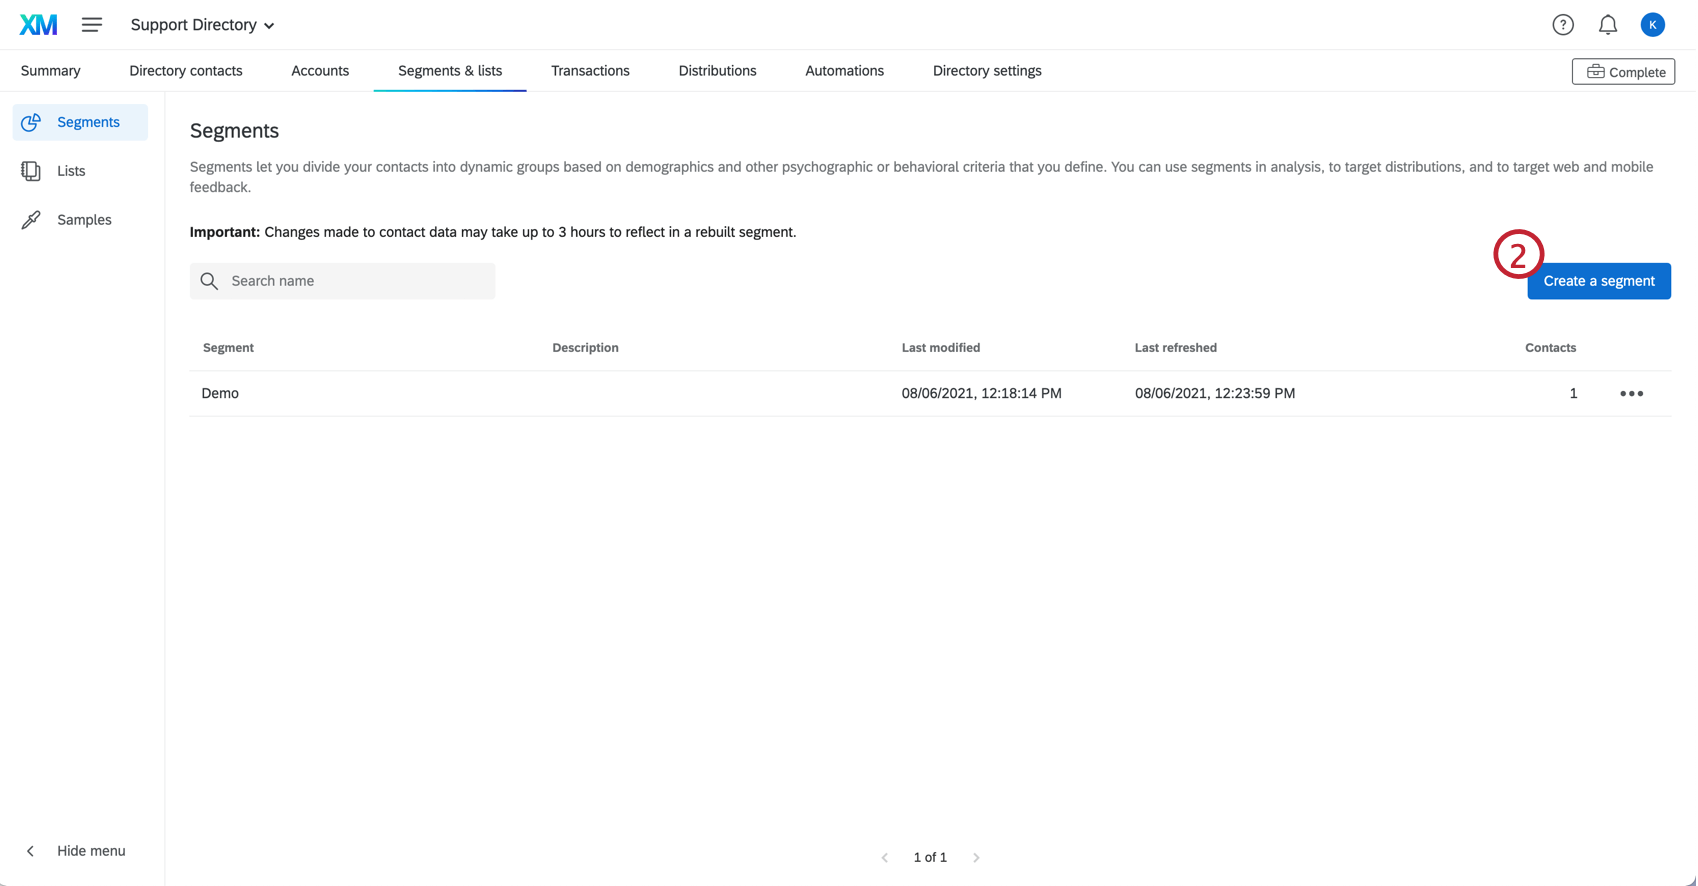
- Click Create a segment.
- Name your segment.
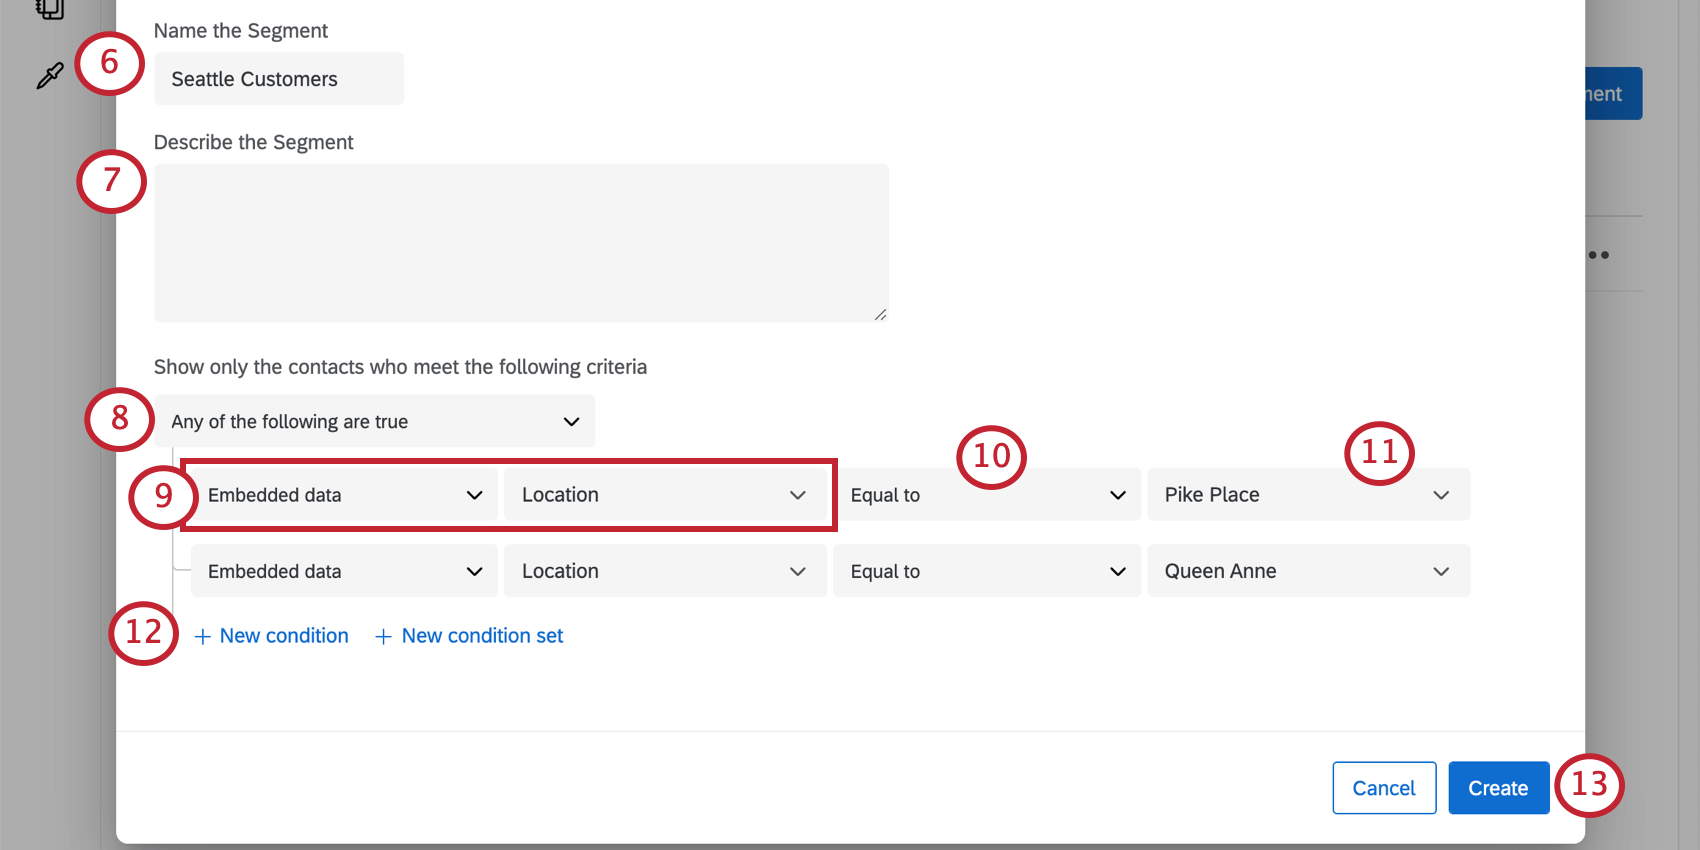
- If desired, add a description for the segment.
- Determine whether all the conditions you will add must be met in order for a contact to be added to the segment, or if it can be any condition.
- Select the field you want to define the segment by. You can choose from:
- Contact info
- Embedded data
- Opt-out status
- Statistics
- Survey response
- Transactions
Qtip: You can see about each of these types of criteria by clicking the links. More often than not, you will probably be using embedded data or transactional data from your directory.
- Specify how you will define the value.
Qtip: Is it an exact match? Choose Equal To. Is it a phrase or term that may be present in the value? Choose Contains. You can also specify whether a value is empty or not, or set numeric fields based on relative values, such as Greater than or equal to.
- Enter the value, or select an existing one from the dropdown.
- Add more conditions or condition sets as needed.
- Click Create.
The segment will search through existing directory contacts to build the segment. This may take some time, especially if your directory has many contacts, so you can safely leave the page while the segment is being generated.
Creating Segments using Spotlight Insights (CX)
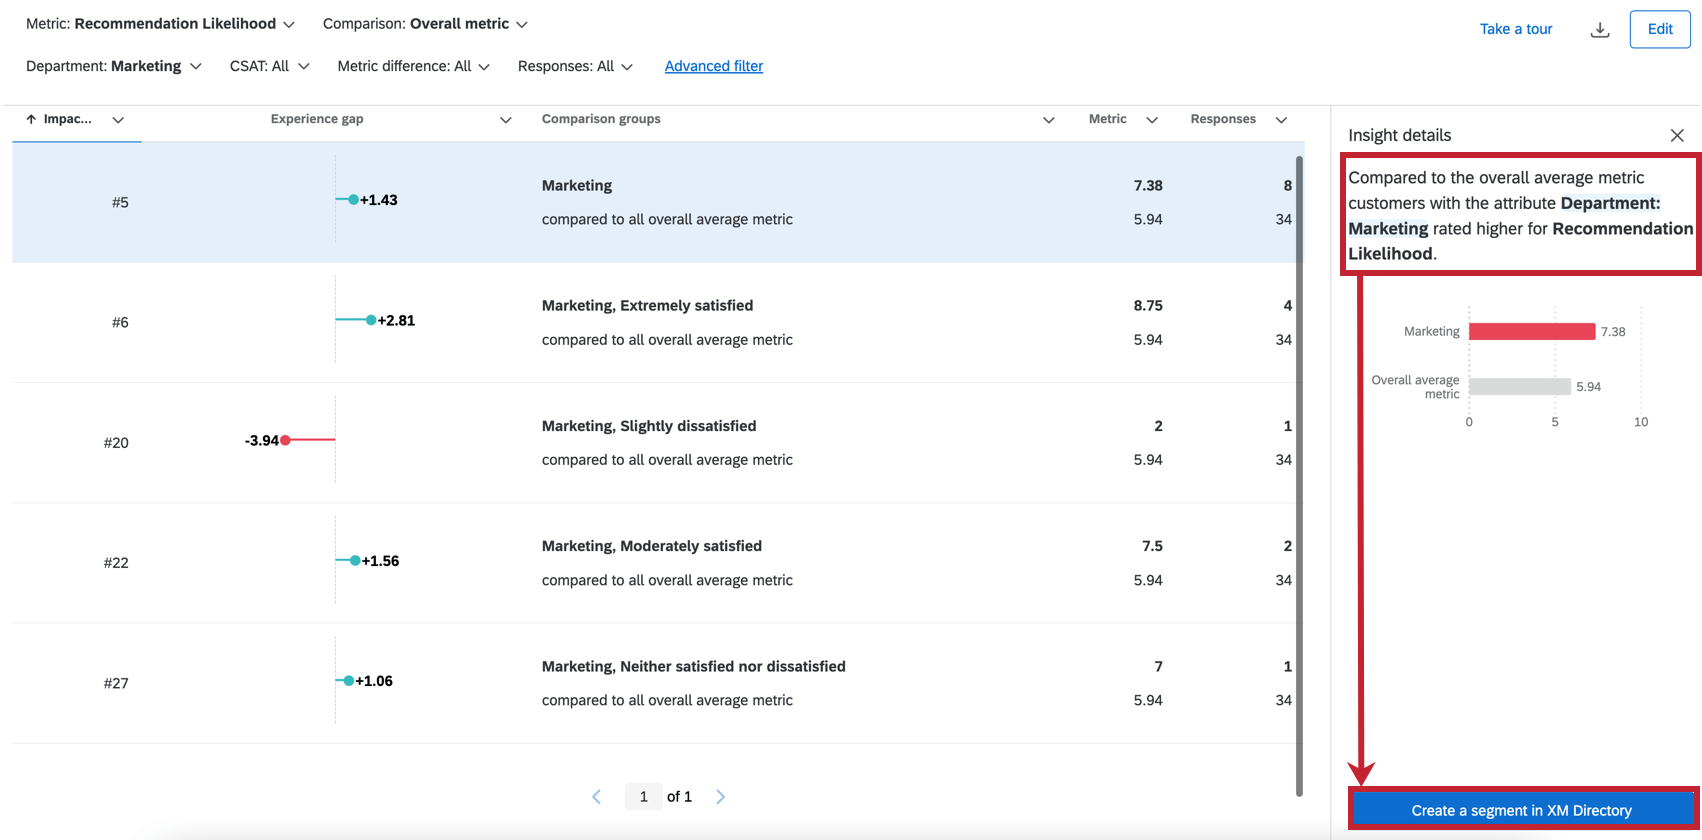
You can create segments directly from your CX dashboards through spotlight insights. For more information on how to use CX spotlight insights, visit the Spotlight Insights (CX) page.
AI-Generated Segments
AI recommended segments use artificial intelligence to evaluate data within your directory and propose industry-specific segments. The AI model will look into the embedded data that exists within your directory, such as demographics and common interests, as well as your industry, and then create segments that optimize business goals like revenue, loyalty, and renewal.
These recommendations can help you discover unique segments that may be overlooked with manual segment creation.
To use an AI-generated segment, follow these steps.
- Navigate to the Directories tab.

- Select the directory where you’d like to add a segment. You may only have access to 1 directory.

- Go to the Segments & lists tab.
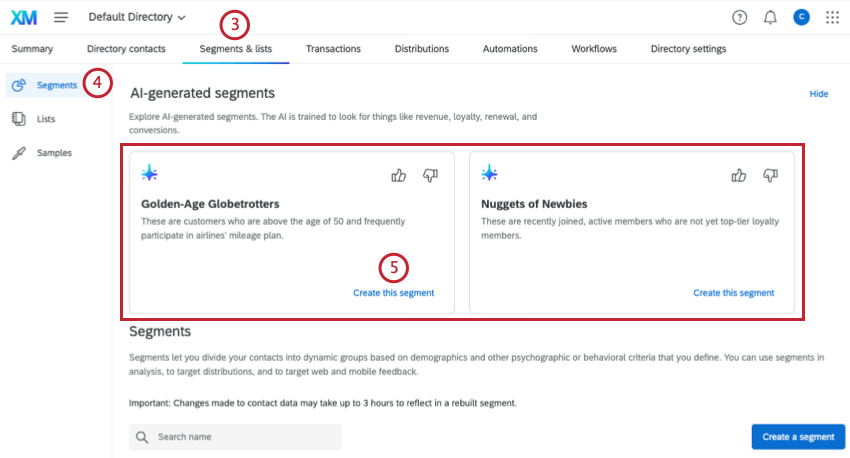
- Make sure you have Segments selected to the left. (This is the default page you will land on.)
- The AI segments generated for your directory will appear at the top of the page. Select Create this segment next to the AI segment you want to create.
The segment will automatically search through existing directory contacts to see which ones match the generated segment criteria. This may take some time, especially if your directory has many contacts, so you can safely leave the page while the segment is being built.
2 segments at a time will be visible within the segments tab. When you create or dismiss a segment, new recommendations will be shown.
Rating Segments
Use the thumbs up and thumbs down buttons to rate the segments that are generated. If you dislike a recommendation, you can provide feedback on what you didn’t like. The recommendation will then be removed from the segments tab. This feedback will be used to improve the recommendation model.
Setting Segment Criteria
Setting the criteria for a segment is similar to building filters in XM Directory. You can set criteria for your segment based on XM Directory information and survey responses. You can learn more about the available XM Directory fields and how to build condition sets at the links below.
List of criteria you can use:
How to combine criteria:
Segment Templates
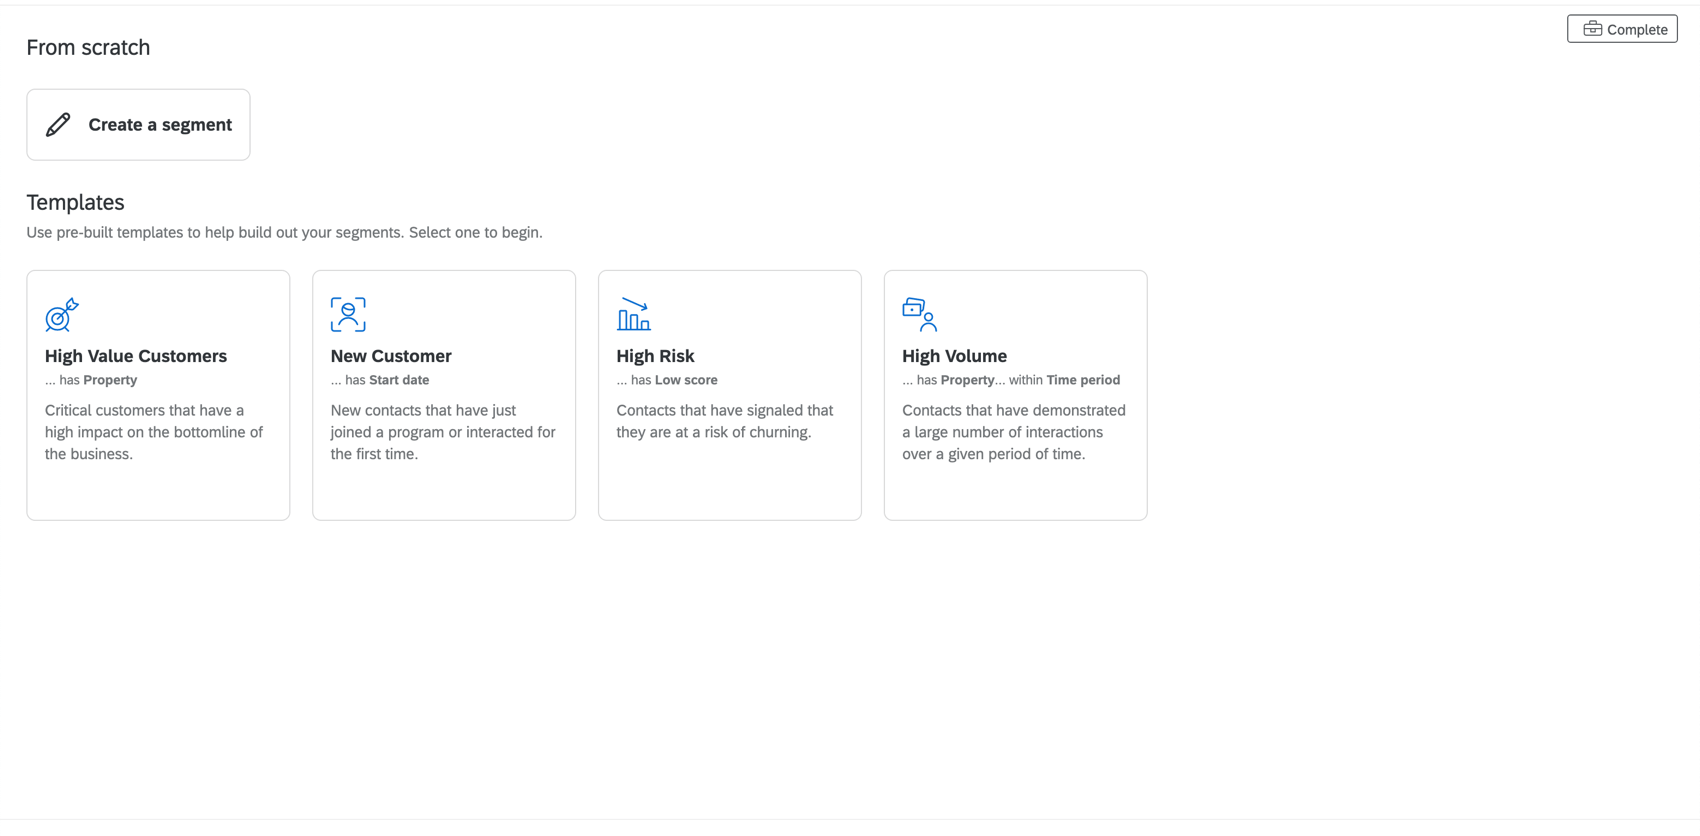
When segmenting contacts, it is important to track core groups that create value across the company. The XM directory provides templates that leverage common segmentation into valuable insights.
- Navigate to the Segments & Lists tab of your directory.
- Click Create a Segment.
- Select one of the templates provided.
- Name your segment.
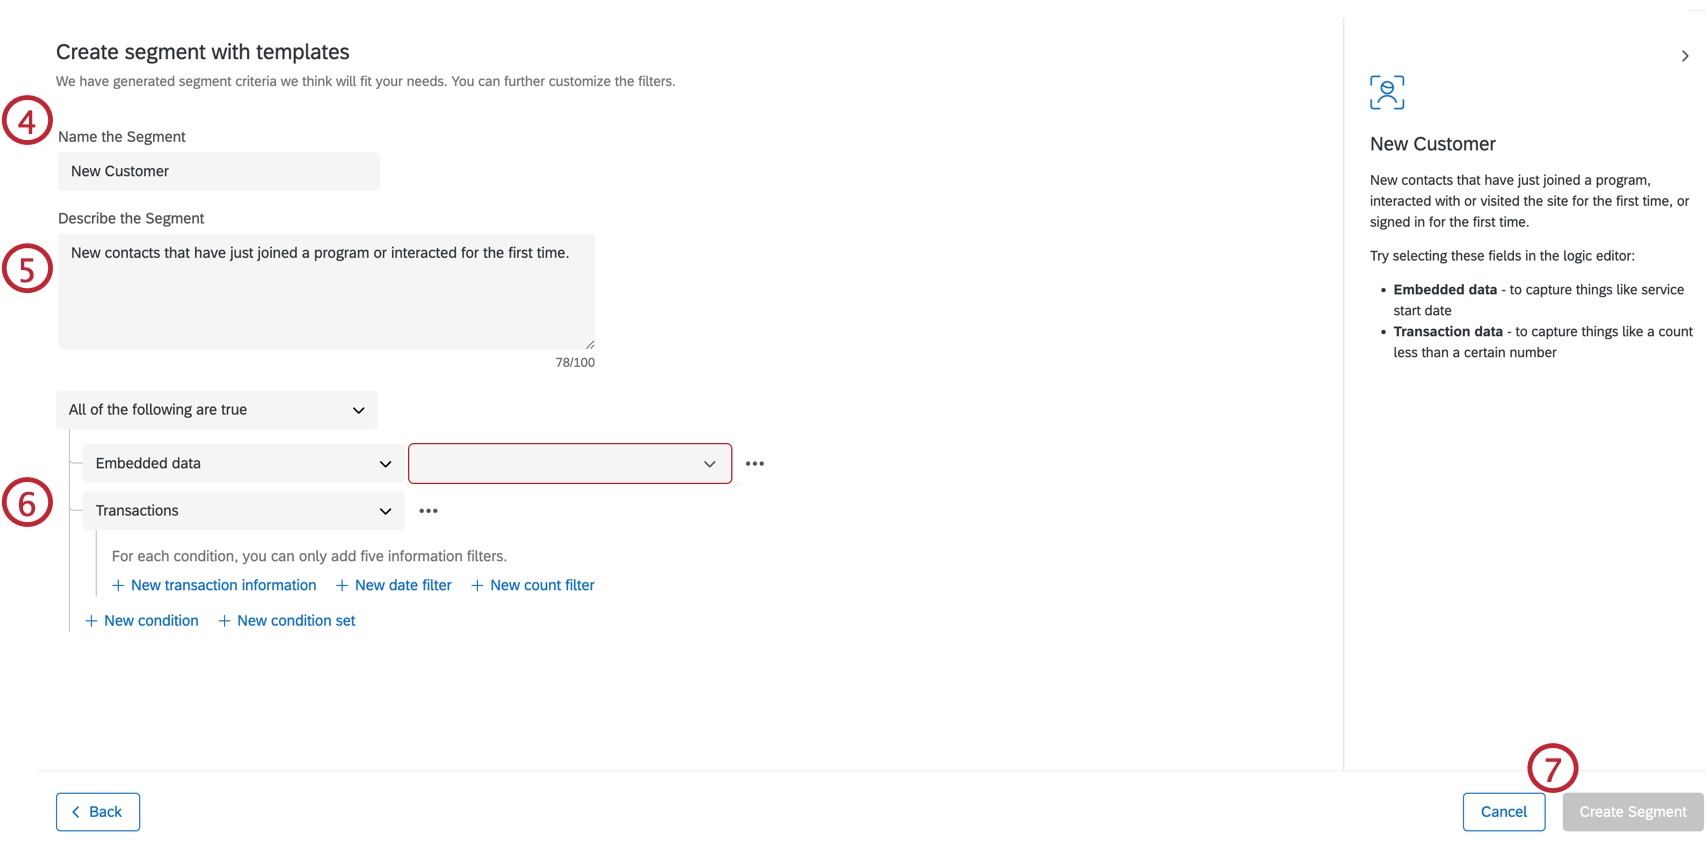
- If desired, add a description for the segment.
- Enter the information for the templated condition. Suggested fields and examples can be found on the right-hand side of the segment window. For more information on creating directory conditions, see our XM Directory Filters page.
- Click Create Segment.
Creating Segments Based on Survey Responses
In addition to creating segments based on XM Directory information, you can create segments based on survey responses. This allows you to segment your contacts based on their responses to your surveys. Follow the steps below to use survey criteria in your segments.
- Create your segment by following the steps above until you reach step 9.
- Select Survey as the field you want to define the segment by.
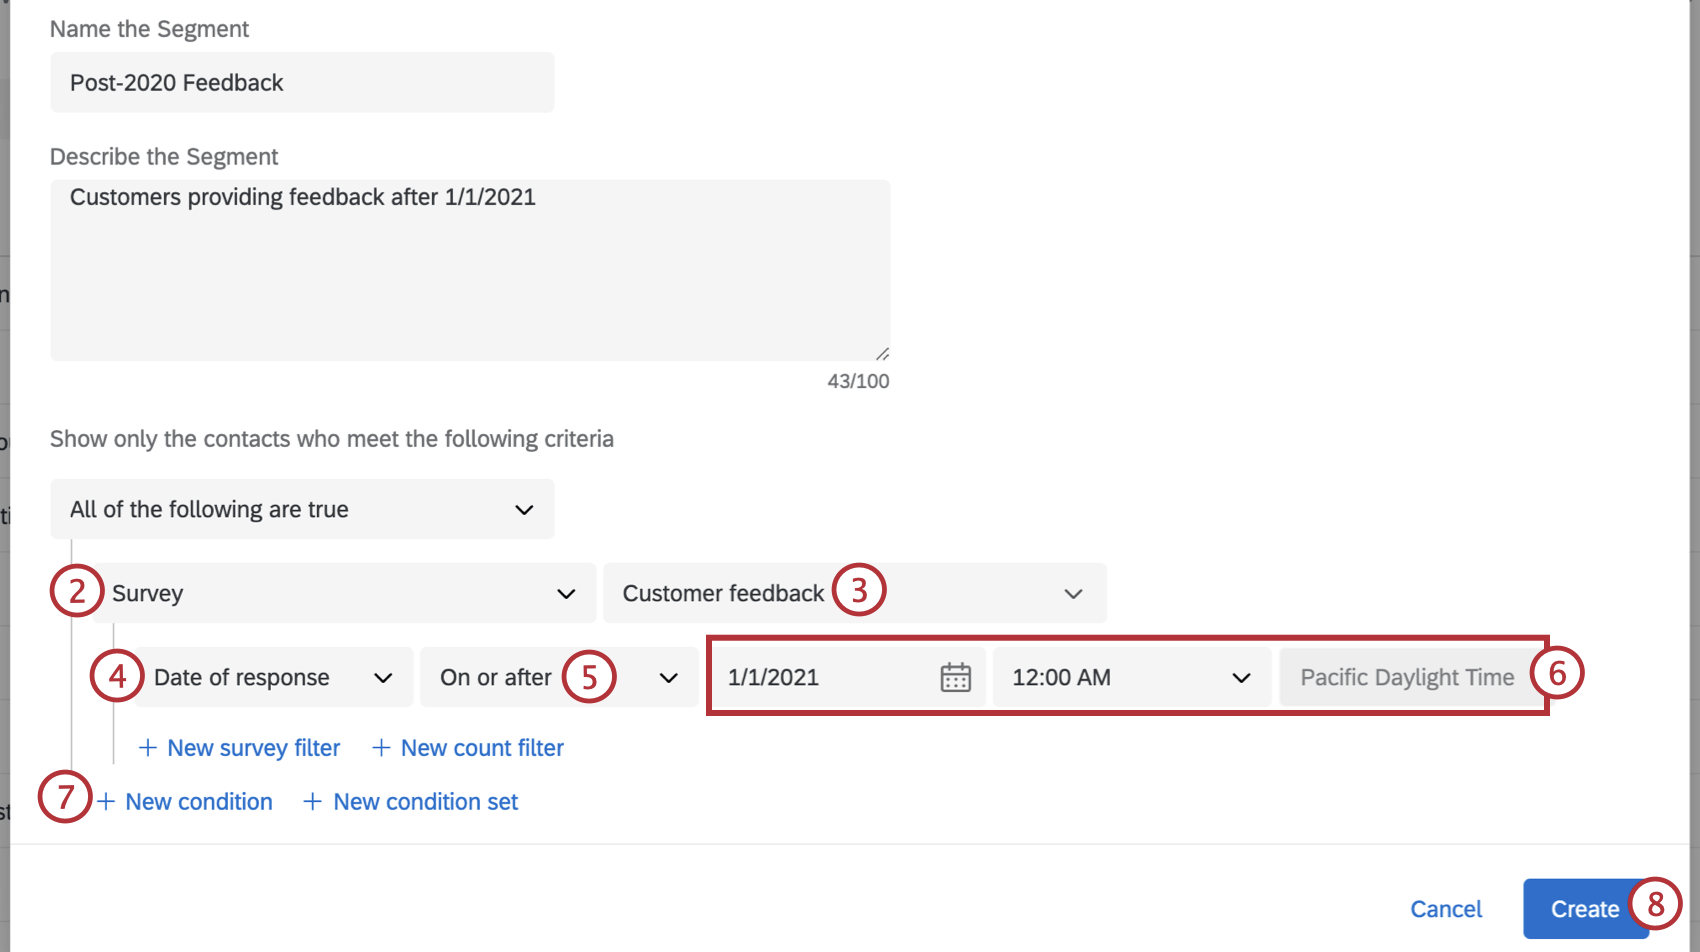
- Select a specific survey.
- Select a specific survey field to define the segment by:
- Question: Build your segment based on how your contacts answered a specific question from the survey.
- Date of response: Build your segment based on when your contacts finished the survey.
- Number of responses: Build your segment based on the number of times each contact completed the survey.
- Specify how you will define the value.
- Enter the value, or select an existing one from the dropdown.
- Add more conditions or condition sets as needed. Conditions based on survey information include the following options:
- Select New survey filter to add a condition based on a contact’s response to a survey question. You can add up to 10 question filters per segment.

- Select New count filter to add a condition based on the number of times a contact responded to the survey. You can add one count filter per segment.

- Select New date filter to add a condition based on when a contact responded to the survey. You can add one date filter per segment.
 Qtip: The maximum number of filters you can have on a segment is 10 per block. You can have a maximum of 10 blocks per segments, which means you can add 100 filters total per segment!
- Select New survey filter to add a condition based on a contact’s response to a survey question. You can add up to 10 question filters per segment.
- Click Create.
The segment will search through existing directory contacts to build the segment. This may take some time, especially if your directory has many contacts, so you can safely leave the page while the segment is being generated.
Segment Trends
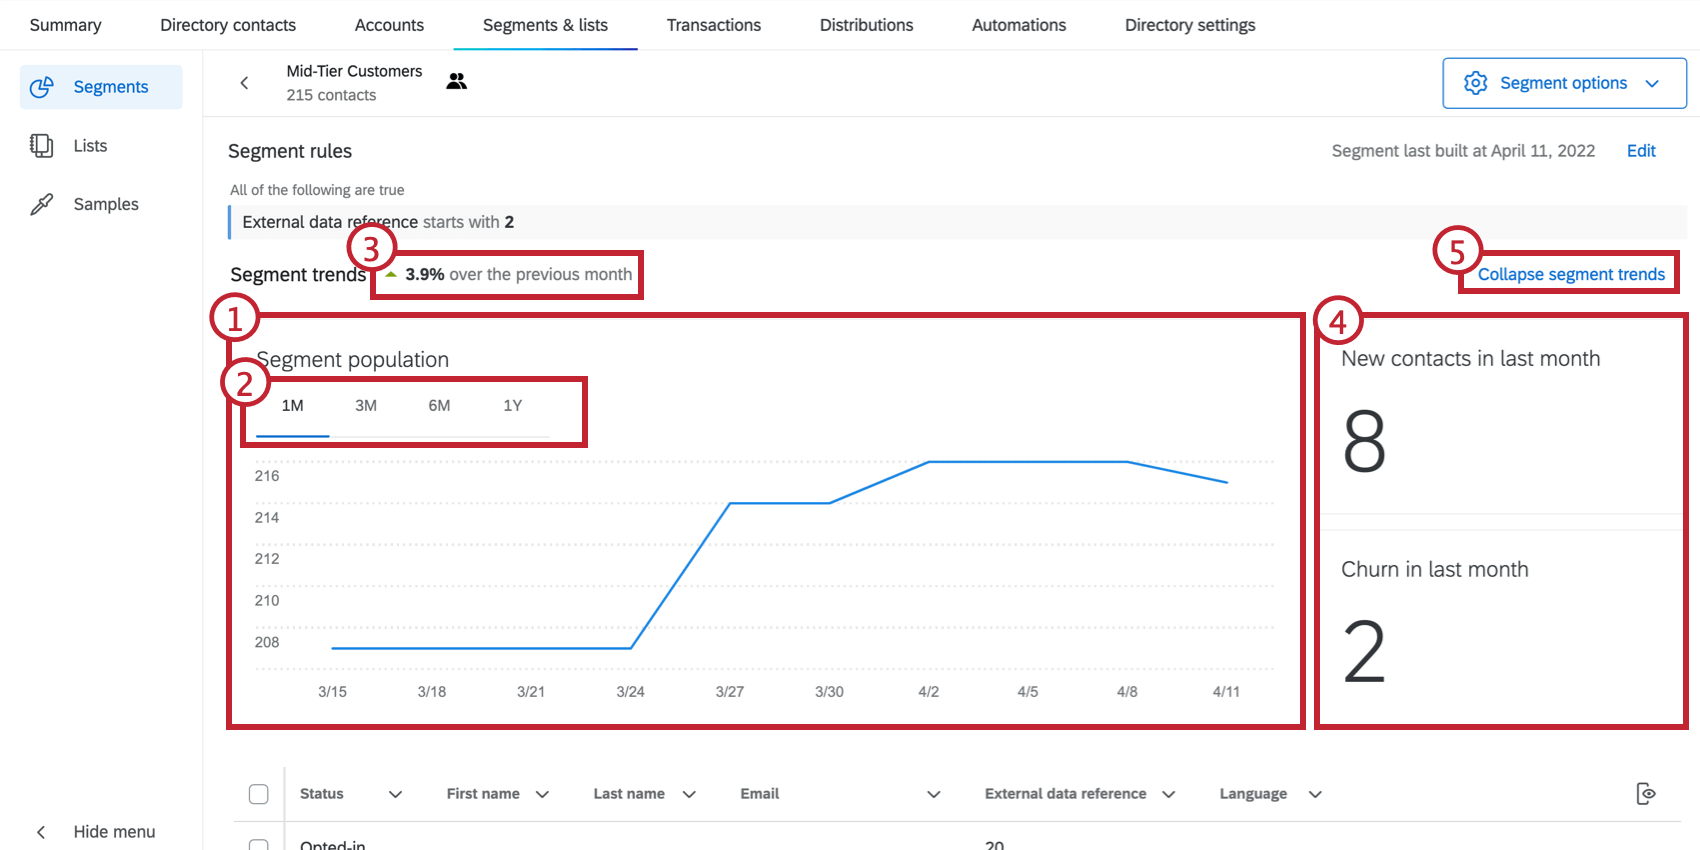
The segment trends chart makes it easy to identify segment membership trends including new contacts and lost subscribers over time.
- Segment trend visualization: This chart displays the number of segment members over time.
- Length of Time: Select for which window of time you would like to view segment membership trends.
- Percent Growth: This figure calculates the percentage of growth over the length of time selected in the segment trend visualization.
- Amount of Growth/Churn: The right of the chart displays the number of new contacts added to the segment and the number of contacts who were removed from the segment for the selected period of time.
Rebuilding Existing Segments
Segments are refreshed within 24 hours. This means that as you add new contacts to the directory that meet the segment’s criteria, or as contacts are updated so that they no longer meet criteria, the segment will take note of these changes and incorporate them once a day by default.
However, if you do not want to wait, you can rebuild the segment at any time.
- Go to the Segments & lists tab.
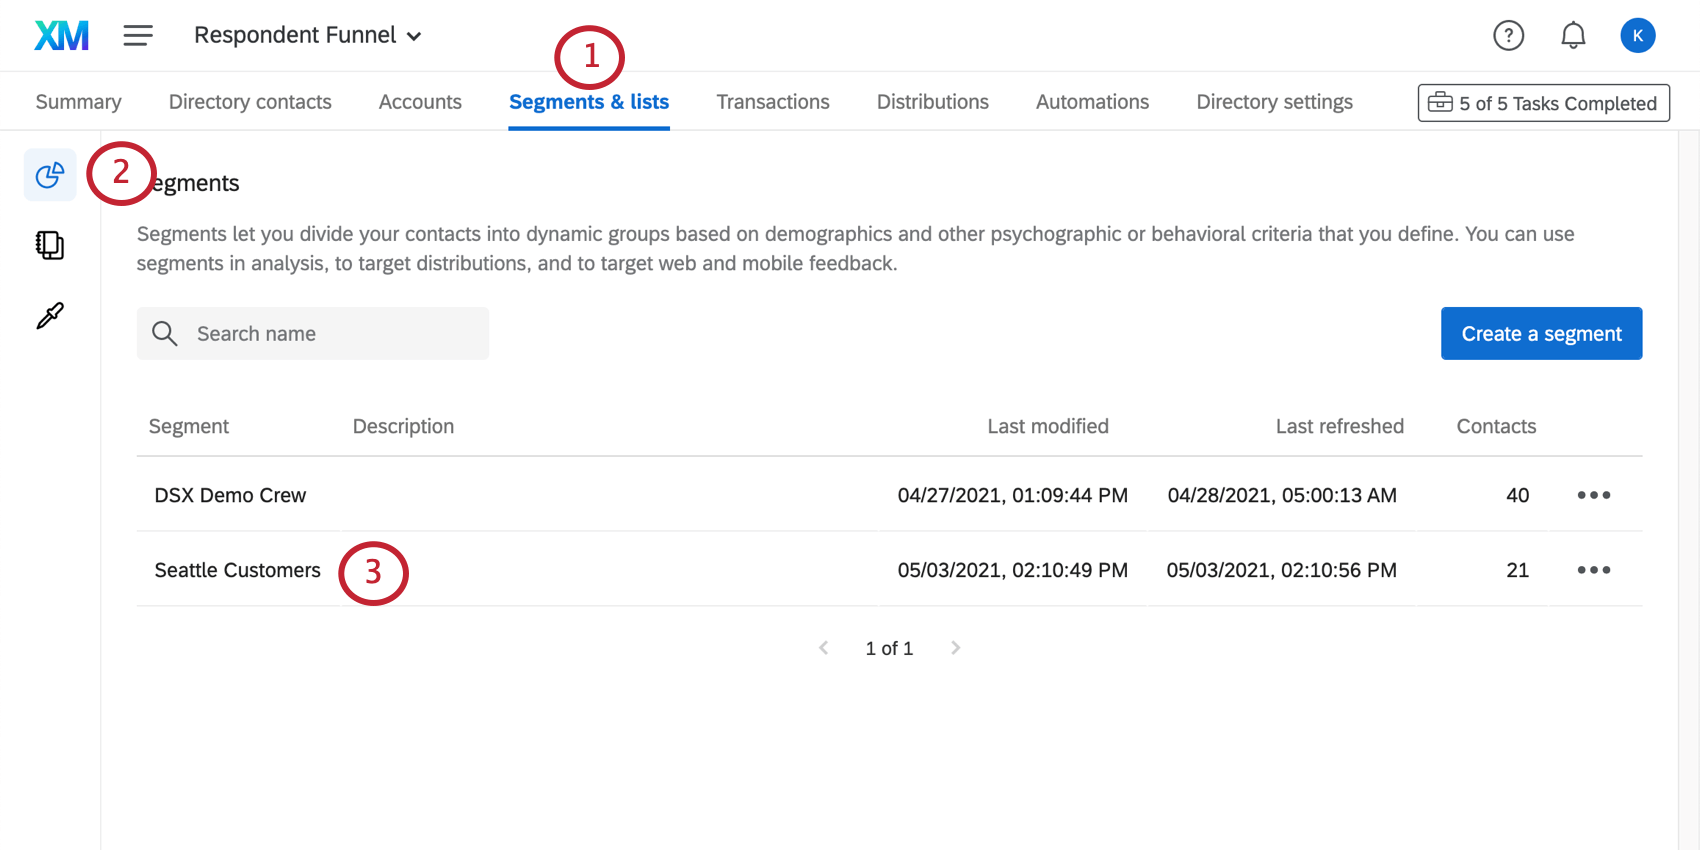
- Make sure you have Segments selected to the left. (This is the default page you will land on.)
- Click the name of the segment you want to rebuild.
- Click Segment Options.
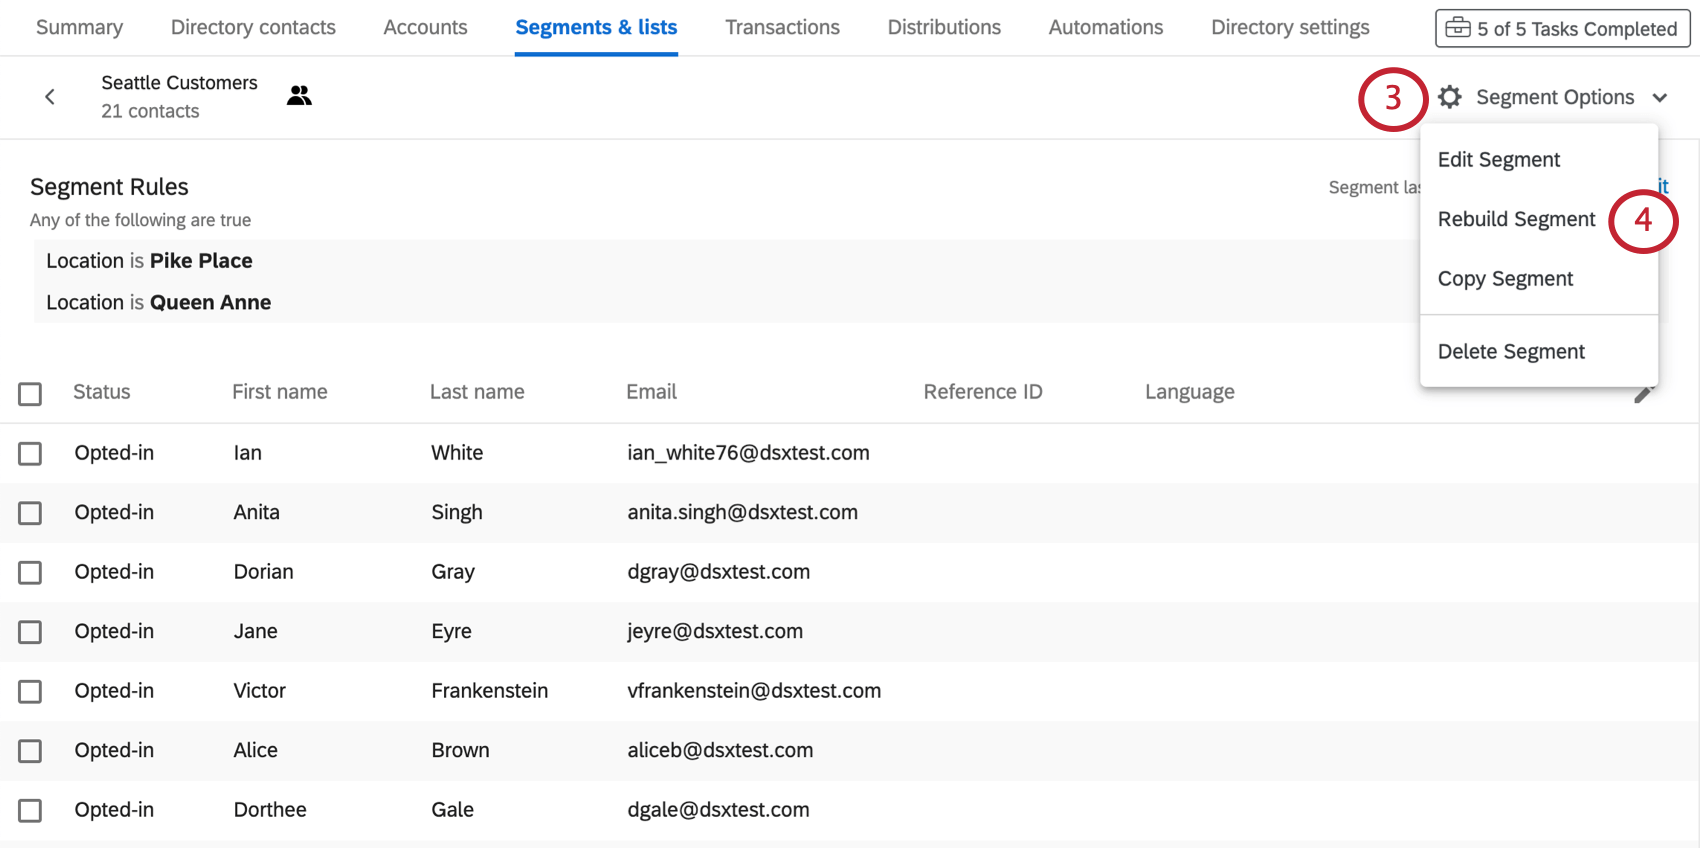
- Select Rebuild Segment.
The segment may take some time to rebuild. Feel free to leave this page while it loads.
Changing the Criteria for an Existing Segment
You can change the criteria for an existing segment. Once you do this, the segment will automatically rebuild itself, incorporating the appropriate contacts and removing those that do not fit the new criteria.
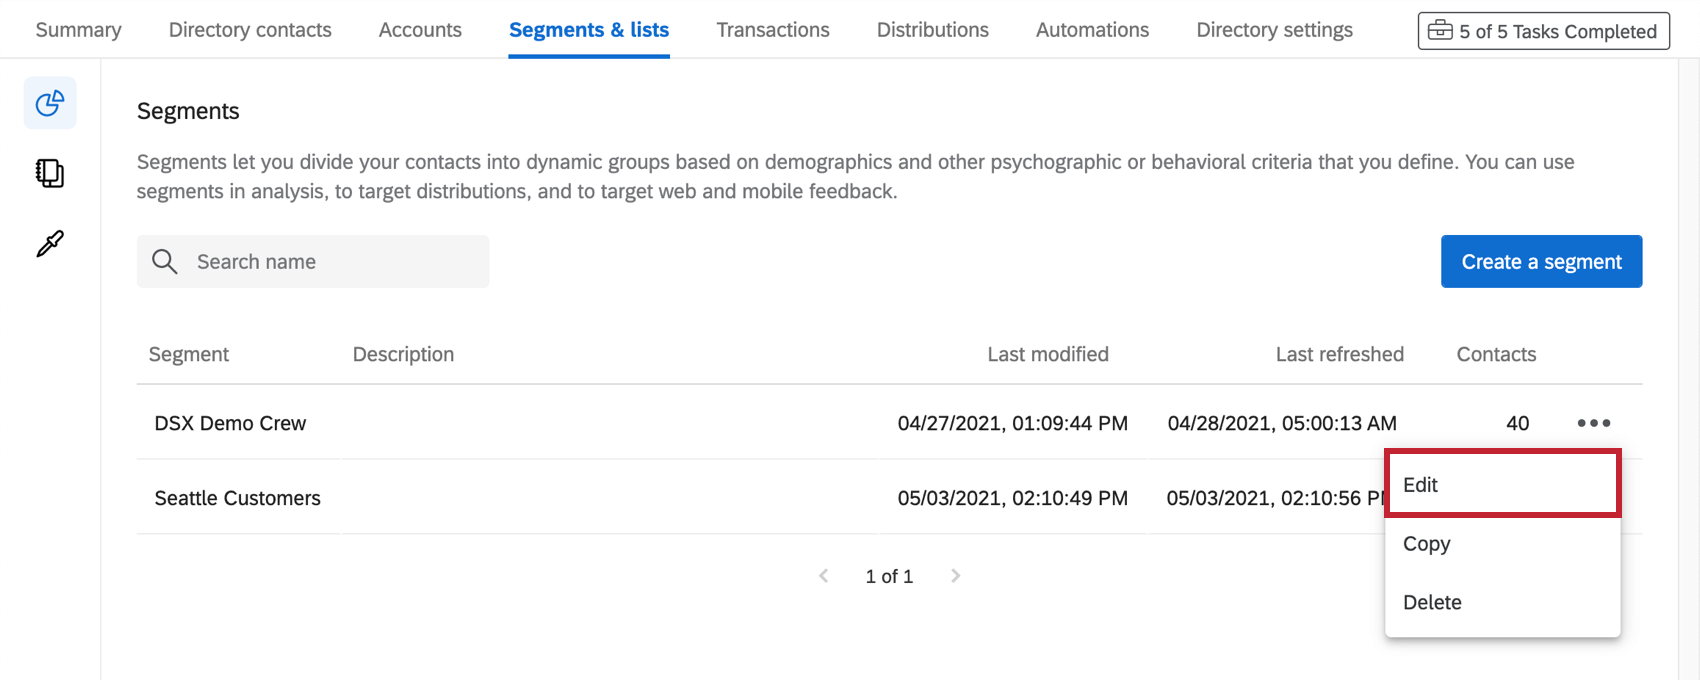
You can edit a segment’s criteria by using the dropdown and selecting Edit.
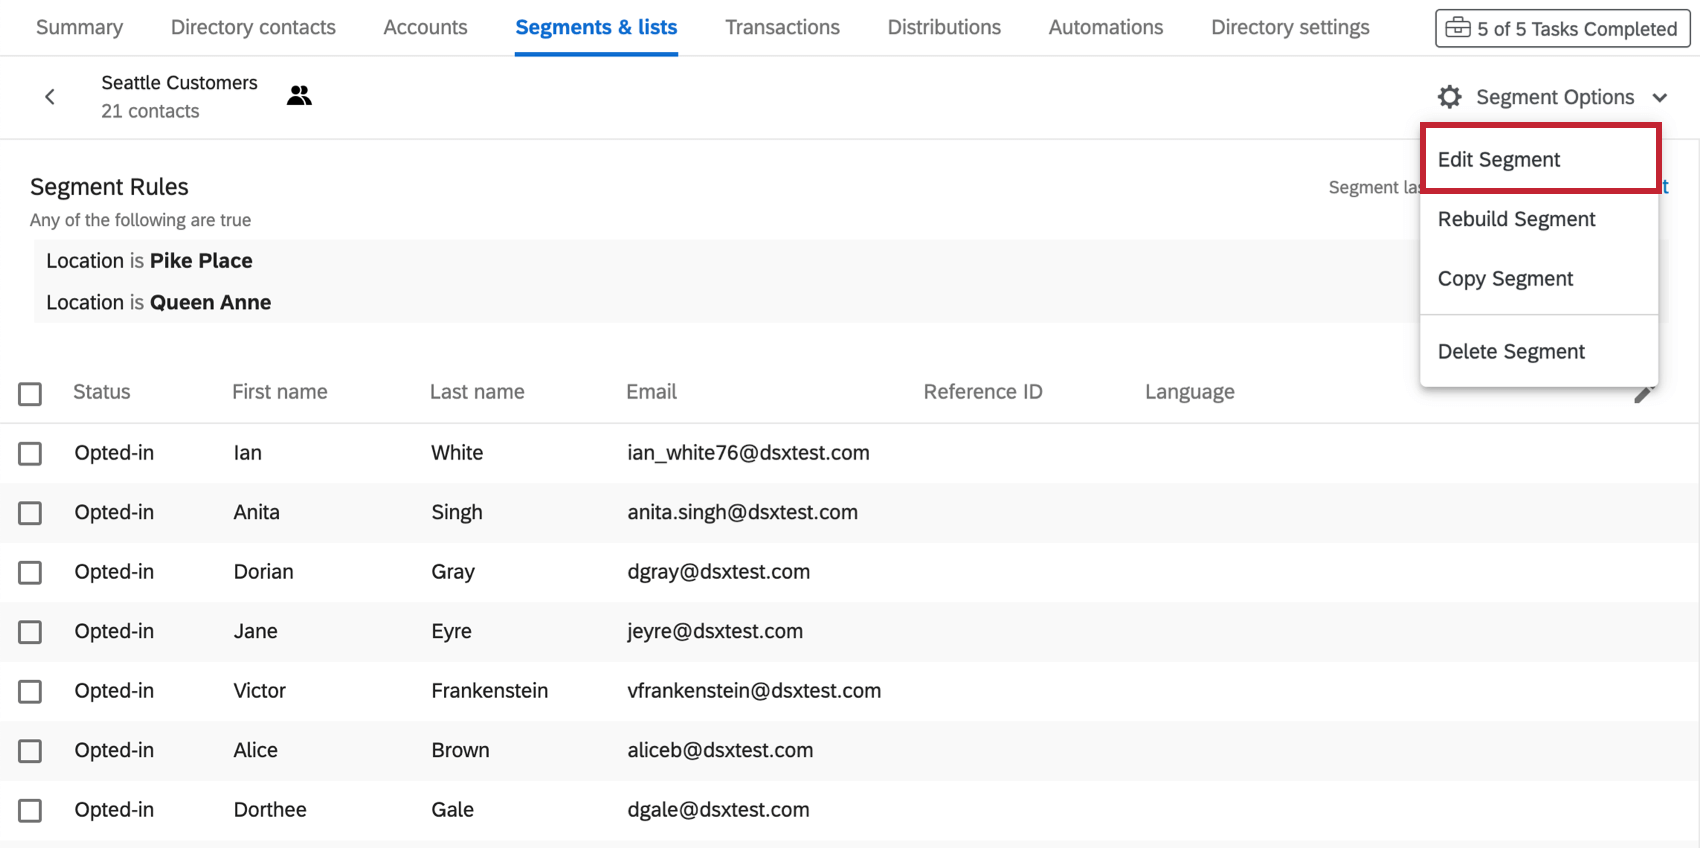
Or, if you’re inside the segment, click Segment Options and select Edit Segment.
Managing Contacts in a Segment
Managing a contact in a segment is mostly the same as managing it in the directory. See Managing a Single Directory Contact for more information. In this section, we’ll cover functionality unique to segments.
You can opt-out contacts on a segment level. This means that the contact will not receive messages sent to that segment. However, they can still receive messages sent to the entire directory, or to a mailing list that they’re opted-in to.
To change the opt-out status for a contact in a segment, click on the contact and go to the Lists section. Then, click the menu button and Opt-out of segment to change their opt-out status.
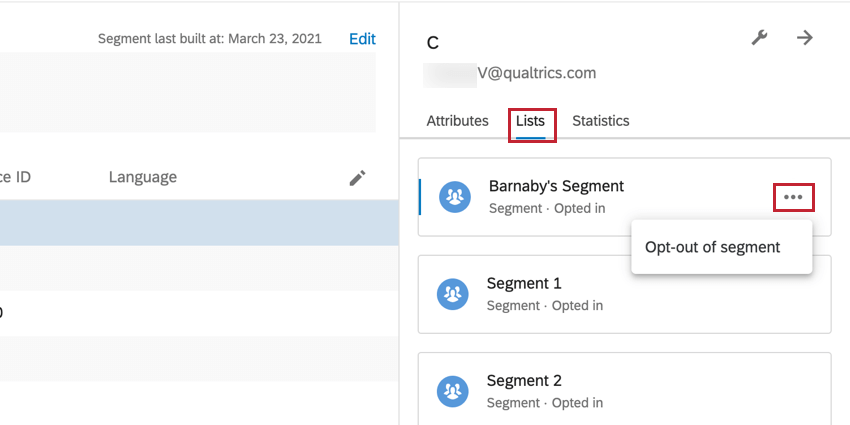
You can also change the opt-out status of many contacts in your segment at once by following these steps:
- Click the checkbox for every contact whose status you want to change.
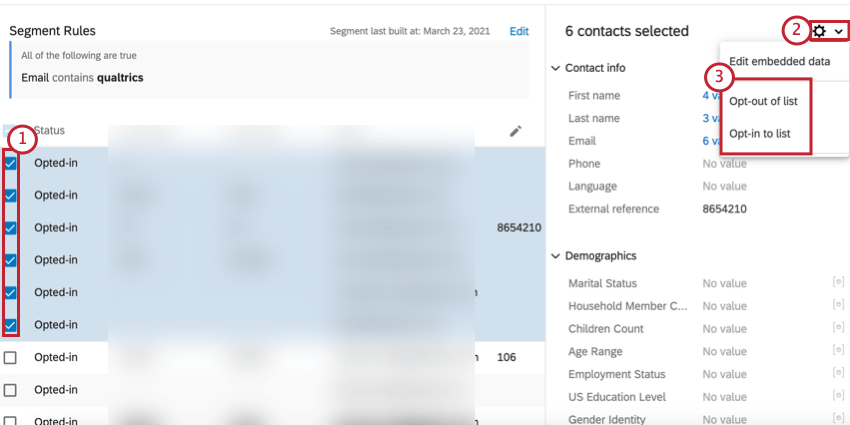
- Click the gear icon.
- Select your desired opt-out status.
Contacts can be opted-out on multiple different levels. See Opt Out Behavior to see how these levels interact with each other.
Copying Segments
Copying segments can be useful if you plan to make a lot of similarly-formatted segments, and only need to change a few criteria at a time.
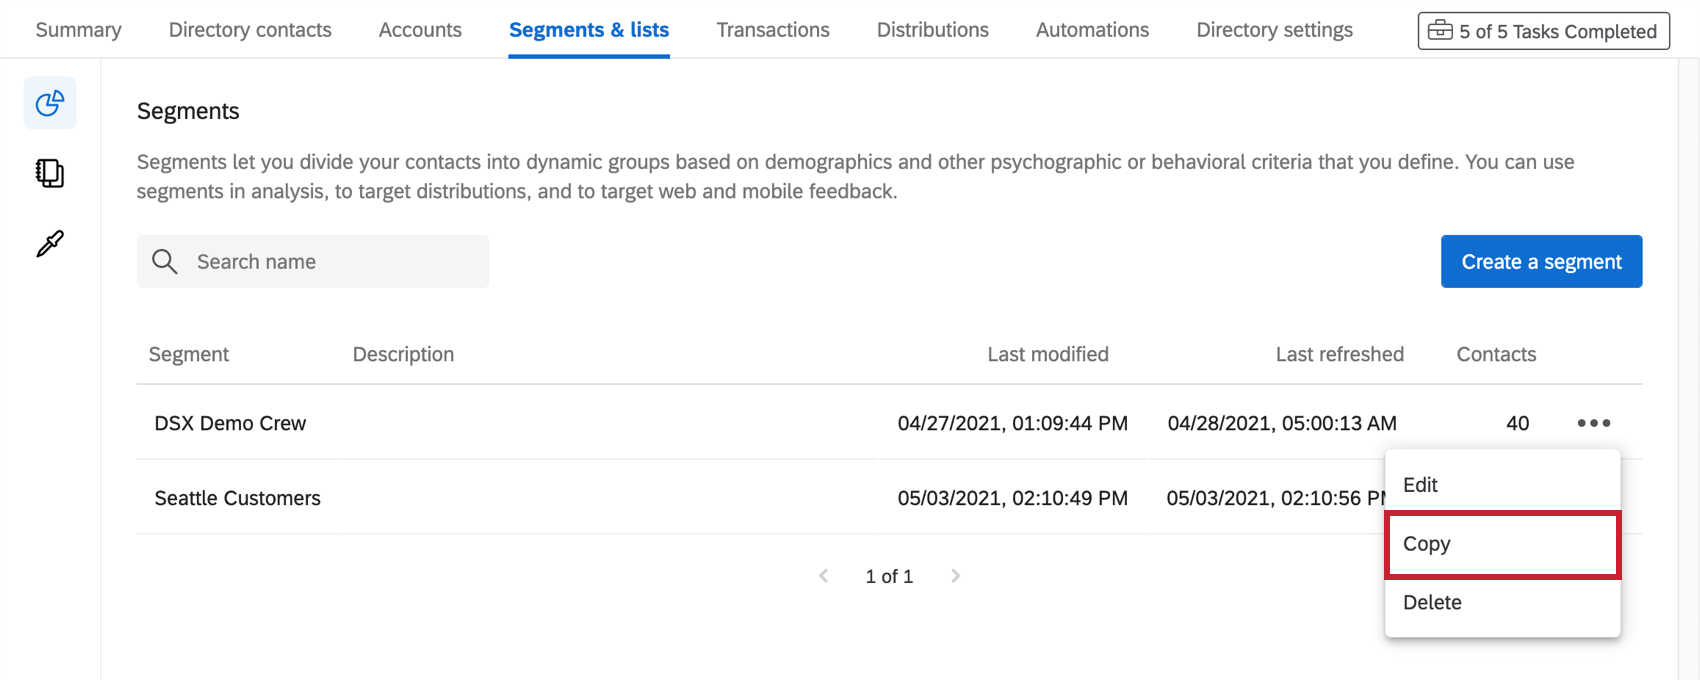
You can copy a segment by using the dropdown and selecting Copy.
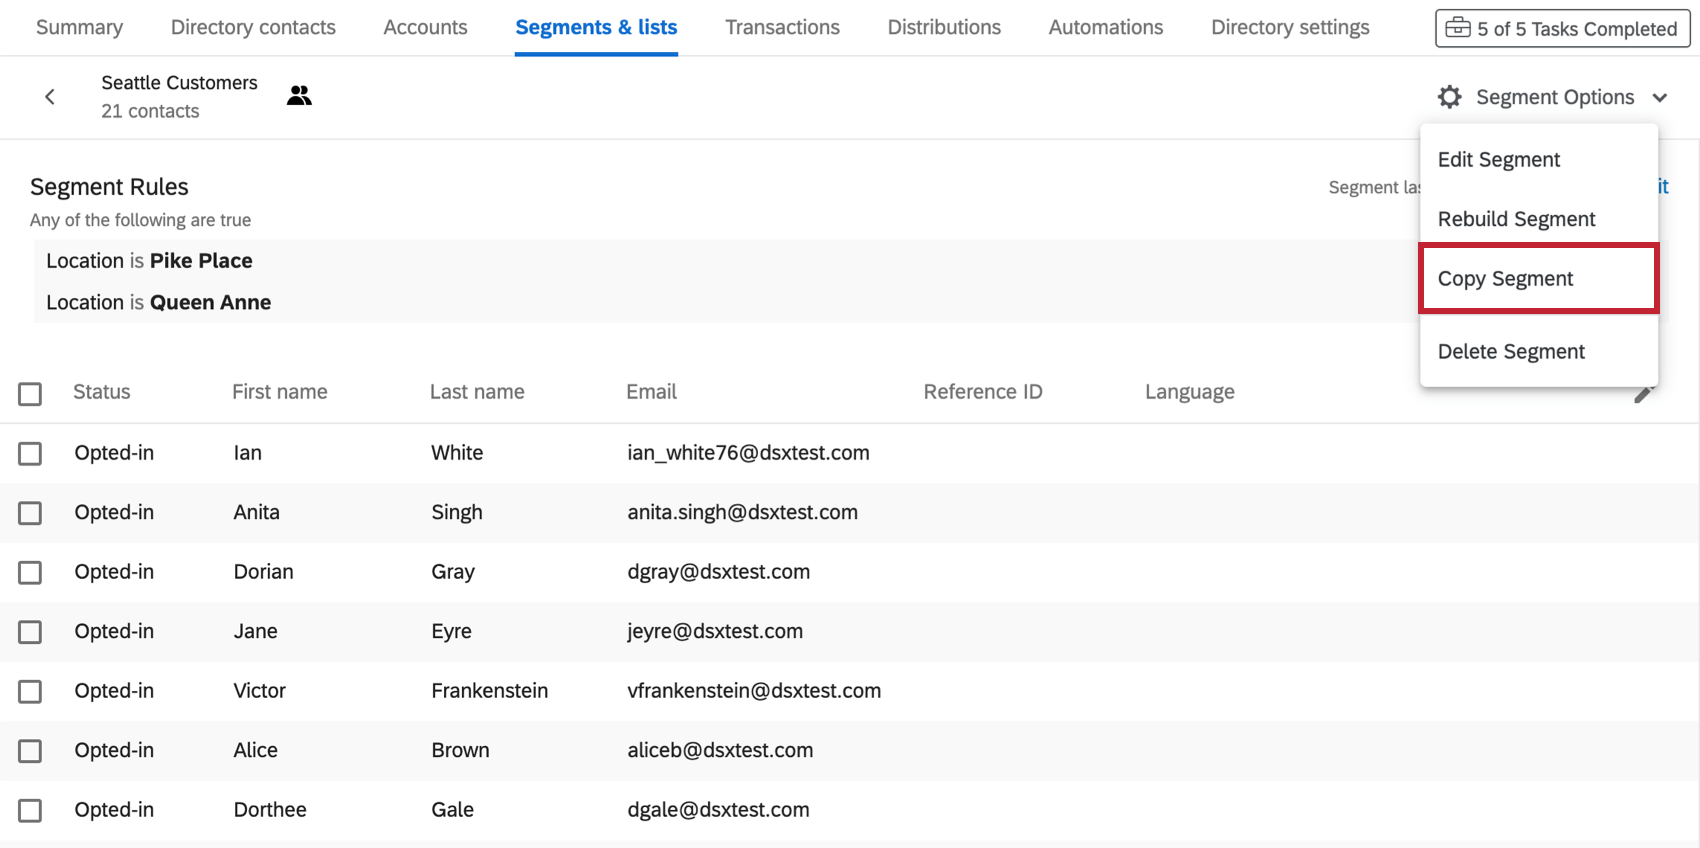
Or, if you’re inside the segment, click Segment Options and select Copy Segment.
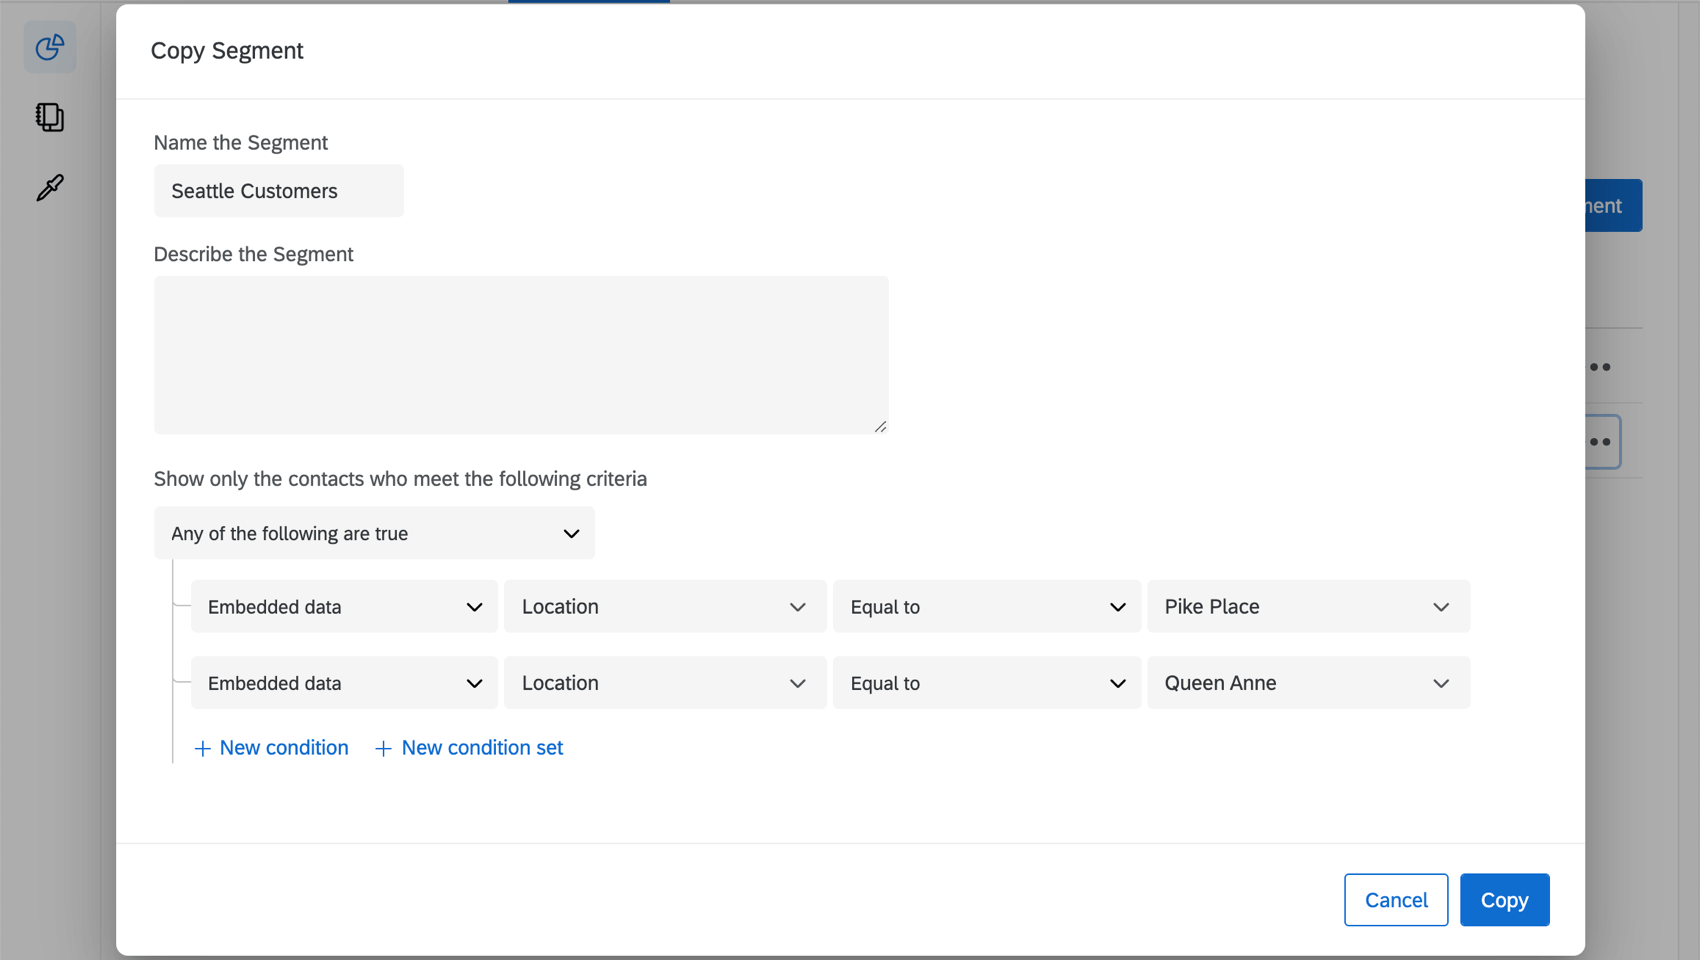
From there, you will be given the exact same criteria and can edit it before you finish creating your new segment. Don’t forget to give your segment a new name.
Deleting Segments
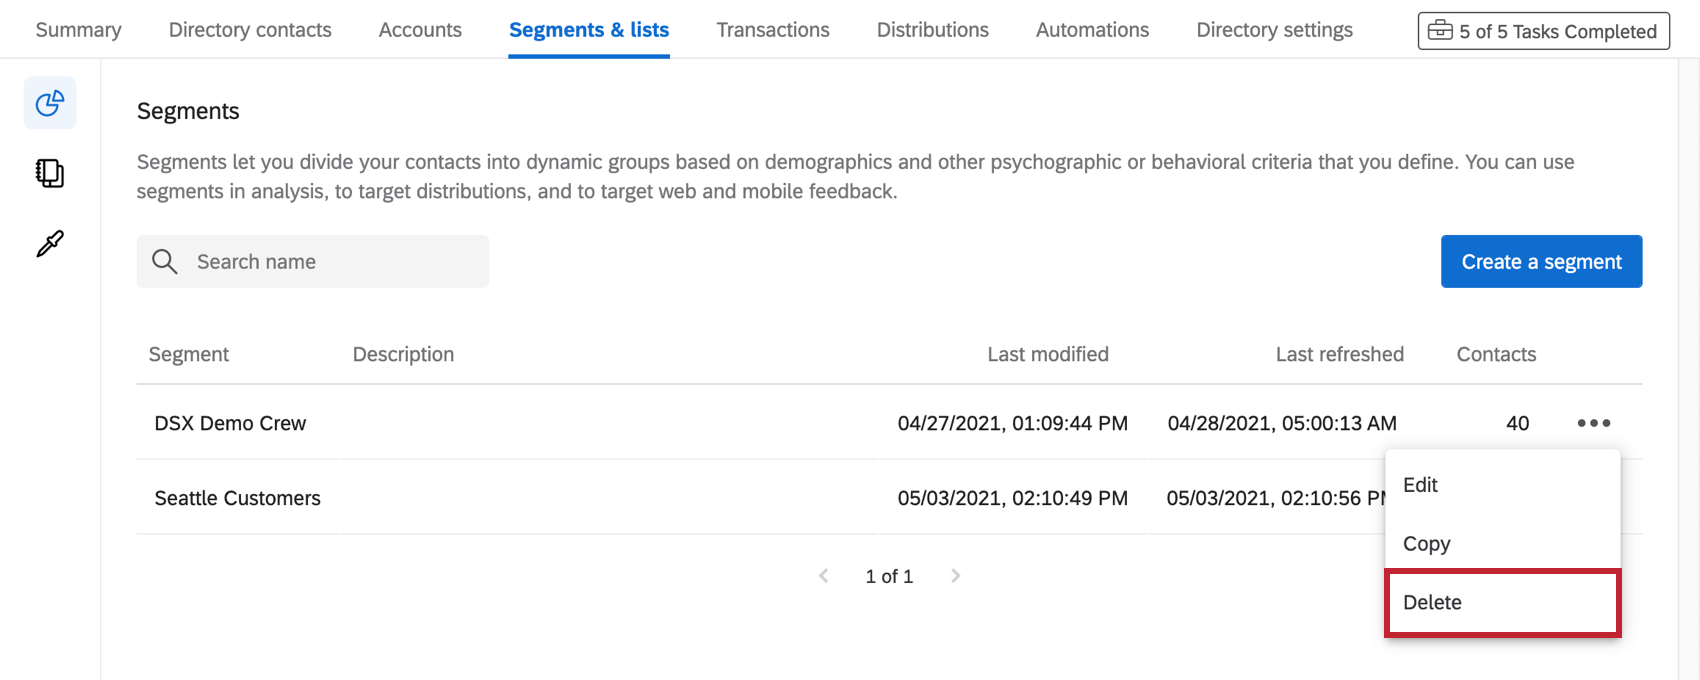
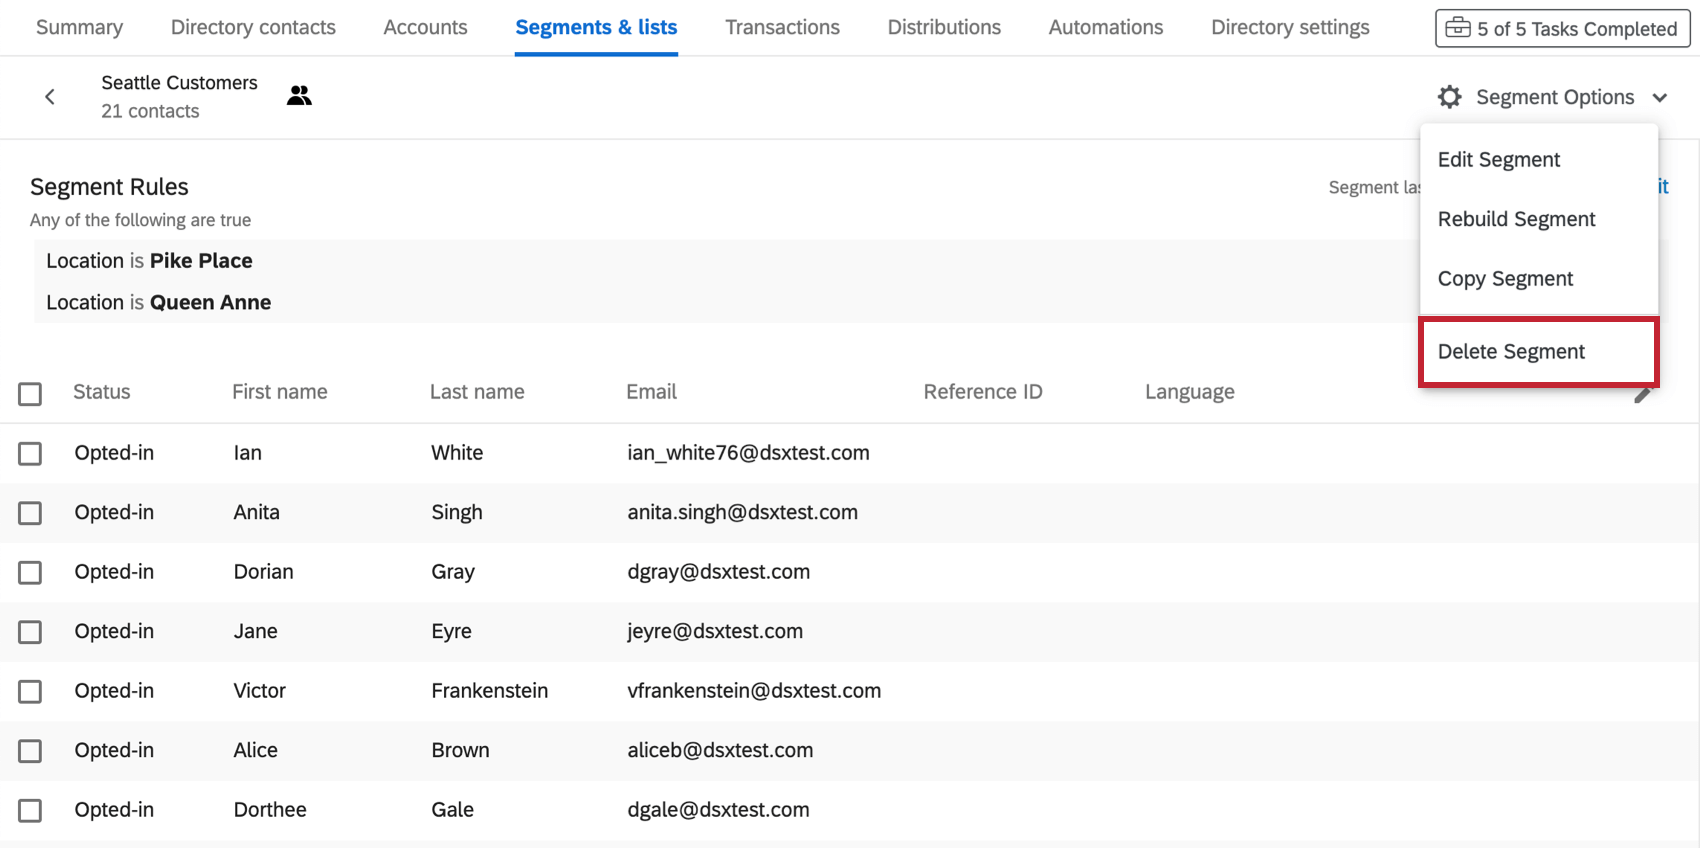
You can delete a segment by using the dropdown and selecting Delete, or, from inside the segment, by clicking Segment Options and selecting Delete Segment.
Using Segments in CX Dashboards
You can use segment membership in your CX Dashboards, making decisions and gathering insights based on which contacts belong to which segments.
To learn more, see Using Segment Data in Dashboards.
Creating Workflows for Segment Membership Changes
As contacts are added to or removed from your segments, you can automatically set off different tasks, such as sending notifications (such as emails or Slack messages), creating tickets (in Qualtrics, Freshdesk, or elsewhere), and much, much more. You can also set workflows when a contact opts into or out of a segment.
See Experience ID Segments Events for more details.
Projects That Can Use Segments
You can use XM Directory to create segments you can then use to distribute to several types of Qualtrics projects. However, not every Qualtrics project type is compatible with XM Directory.
XM Directory can be used to send the following:
- Survey projects
- Conjoint / MaxDiff
- Certain non-EX XM Solutions
In contrast, XM Directory cannot be used to distribute any Employee Experience (EX) projects. That means that no EX projects can be used with XM Directory, including Engagement, Pulse, 360, and more.
XM Directory contact data is completely separate from the employee / participant information saved in the Employee Directory. That means that data edited in one directory will never affect the other, and employee directory information cannot be used to build segments.
